Azure Veneziano – Part 3

This is the third part of my Internet-of-Things telemetry project based on Azure.

The source of the project is hosted in the azure-veneziano GitHub repository.

The sample report as shown in this article can be downloaded here.

Here are the other parts:

In this article I’ll show you how to refine the notification of an event by creating a detailed data report.
This post closes the basic part of the project. There will be other articles related to the Azure Veneziano project, but they are mostly additional components and enrichment to the base system.

The problem.

When the system alerts you about, for instance, the outside temperature which is getting higher the more is sunny, I believe there’s no need of any detail on.
However, the things could turn dramatically different if you receive a notification such as “your aquarium temperature is greater than 35°C”. Unless you have very special fishes, there are just two possibilities:

  1. the fishes are in a serious danger, or
  2. something is broken (e.g. the probe, the wiring, etc).

Fish_tank_(2)In the first case, there’s no other way than making some immediate action before the fishes die. In the second case, you could even tolerate the failure knowing that the system is unable to work properly, until it will be fixed.
However, if you’re at the mall, for instance, and you receive such a mail: what would you do? Better question: how to know what kind of problem is? Also, how the system evolved before facing the issue?
Of course you can add “redundancy” to the telemetry system, so that you’ll have more info (and that’s always a good thing). For instance, you could use two probes instead of just one. Since the fishes life is in danger, a probe more is actually a natural choice.
Anyway, if you receive a simple message like “the water temperature is 55°C”, you can’t understand where the problem is. A bit different if the message shows you the “evolution” of that temperature. If the evolution acts like a “step”, where the temperature rises to a prohibitive value in a few time, then it’s probably something broken in the hardware. Reasonably, the aquarium tank can’t get hotter in minutes or less.
All that depicts a scenery where a collection of values over time is an useful “attachment” to the alerting message. Here, the target is representing the data collected as both chart and table fashion.

Looking for the right library.

As for report I mean a simple document, which contains details on what happened. For this project, we’ll create a three-pages report with a couple of charts, and also a brief tabular history of the collected data.
Once again, I’d like to remember that this project is a kind of “sandbox” for something professional. Thus, I prefer to try “a bit of everything” in order to take practice with the environment: Azure at first, then several accessories. For this reason, I wanted the ability to create the report document in both Word- and PDF-format.
Around the Internet there is plenty of creation and conversion tools, but most of them are very expensive. In a professional context that would be feasible, but of course isn’t acceptable for any home/hobby target.

Finally, I bumped against the Spire.Doc Free-edition by e-iceblue.
They offer a complete suite of tools for many standard formats. Despite their regular price is off the hobbyist-pocket, they also offer the Free-Edition option. I tested only the Spire.Doc component (tailored for the Word documents), and the limitations are pretty acceptable. At first glance some limitation looks like a wall, but it’s easy to play around the APIs and to find the right trick!
Moreover, when I had some trouble with the library, I asked them an help by the forum, and the answer came very quickly.

How to create your own report.

The usage of the Spire.Doc library is very simple, however I created a series of support functions in order to specialize the code for the report creation.
It’s worthwhile to say that the generated report is meant as “attachment” for the notification mail, so the below code is called automatically when the logic sends a mail.
The only thing the logic should specify is the list of useful variables to detail in the report. That’s an obvious requirement, especially when you deal with many variables.

        public void Run()
        {
            LogicVar analog0 = MachineStatus.Instance.Variables["Analog0"];
            LogicVar analog1 = MachineStatus.Instance.Variables["Analog1"];

            if ((analog0.IsChanged || analog1.IsChanged) &&
                (double)analog0.Value > (double)analog1.Value
                )
            {
                var message = "The value of Analog0 is greater than Analog1.";

                var mail = new MailMessage();
                mail.To.Add("vernarim@outlook.com");
                mail.Body = message;

                var rdp = new ReportDataParameters();
                rdp.OverviewText.Add(message);

                rdp.PlotIds.Add("Analog0");
                rdp.PlotIds.Add("Analog1");
                rdp.PlotIds.Add("Switch0");
                rdp.PlotIds.Add("Switch1");
                rdp.PlotIds.Add("Ramp20min");
                rdp.PlotIds.Add("Ramp30min");

                MachineStatus.Instance.SendMail(
                    mail,
                    rdp
                    );
            }
        }

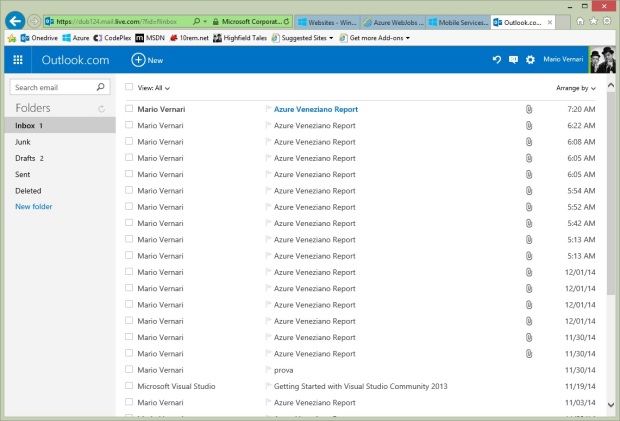
Here is the mail incoming in my mailbox…

mailbox

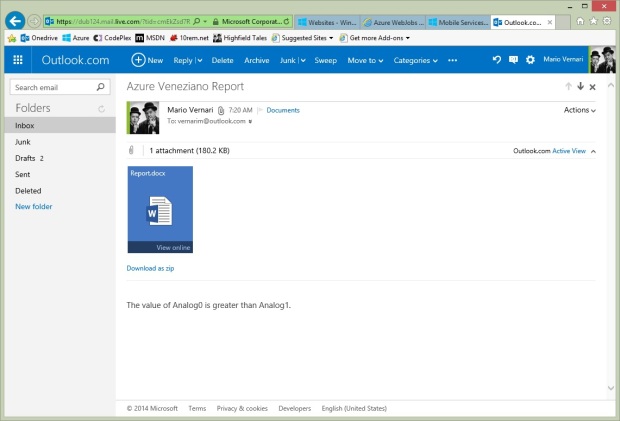
…and here once I open the message:

mail

Let’s walk the report generation code step-by-step…

The very first thing is to specify some personalization data, such as the title, some pictures, and even the page size (default is for European A4-sheet).

        private void CreateReport(
            MailMessage mail,
            ReportDataParameters rdp
            )
        {
            //set the basic info for the report generation
            var info = new ReportGeneratorInfo();
            info.ProjectTitle = "Azure Veneziano Project";
            info.ProjectUri = "https://highfieldtales.wordpress.com/";
            info.ProjectVersion = "2014";

            info.ReportTitle = "Alert Data Report";

            //cover logo image
            var stream = this.GetType()
                .Assembly
                .GetManifestResourceStream("AzureVeneziano.WebJob.Images.WP_000687_320x240.jpg");

            info.CoverLogoImage = new System.Drawing.Bitmap(stream);

Then, since the cover is made up from a well-defined template, its creation is straightful immediately after the document model. I also used an extension-method pattern so that the various function invocation will shape as fluent-fashion.

            /**
             * Cover
             **/
            var document = ReportGeneratorHelpers.CreateDocument(info)
                .AddStandardCover(info);

What’s behind?
There’s nothing secret. Those functions are only a shortcut for easy manipulating a report, but anyone could create his/her own functions.
The document generation creates a Document instance, defines its properties as well as the available styles. Please, note that the library comes with several pre-defined styles, but I wanted to create my own:

        /// <summary>
        /// Create a new Word document based on the given parameters
        /// </summary>
        /// <param name="info"></param>
        /// <returns></returns>
        public static Spire.Doc.Document CreateDocument(
            ReportGeneratorInfo info
            )
        {
            //create new document
            var document = new Spire.Doc.Document();

            /**
             * Define styles
             **/
            {
                var style = new Spire.Doc.Documents.ParagraphStyle(document);
                style.Name = "Title";
                style.CharacterFormat.FontName = "Calibri Light";
                style.CharacterFormat.FontSize = 28;
                style.CharacterFormat.TextColor = System.Drawing.Color.FromArgb(91, 155, 213);
                style.ParagraphFormat.BeforeSpacing = InchesToDots(0.2);
                style.ParagraphFormat.AfterSpacing = InchesToDots(0.2);
                document.Styles.Add(style);
            }

            // ...

            //create section...
            Spire.Doc.Section section = document.AddSection();
            section.PageSetup.DifferentFirstPageHeaderFooter = true;
            section.PageSetup.DifferentOddAndEvenPagesHeaderFooter = true;

            //...define page size and orientation
            section.PageSetup.PageSize = info.PageSize;
            section.PageSetup.Orientation = info.PageOrientation;

            //...then margins...
            section.PageSetup.Margins.Top = InchesToDots(info.PageMargin.Top);
            section.PageSetup.Margins.Bottom = InchesToDots(info.PageMargin.Bottom);
            section.PageSetup.Margins.Left = InchesToDots(info.PageMargin.Left);
            section.PageSetup.Margins.Right = InchesToDots(info.PageMargin.Right);

            /**
             * Page header
             **/

            // ...

            /**
             * Page footer
             **/

            // ...

            return document;
        }

So far, so well.
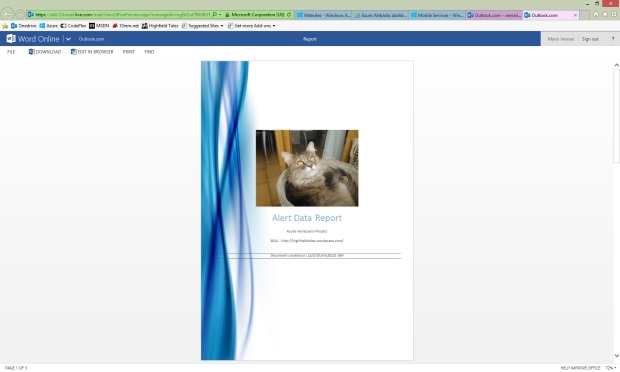
If you wonder what’s the result at this point, here is a snapshot:

report-1

Please, since I was running out of logo pictures of my “Home Company”, I turned for a picture of my boss, far serious than many CEOs all around the world.
Hope you love her!

Let’s turn page: here the work begins to get harder.
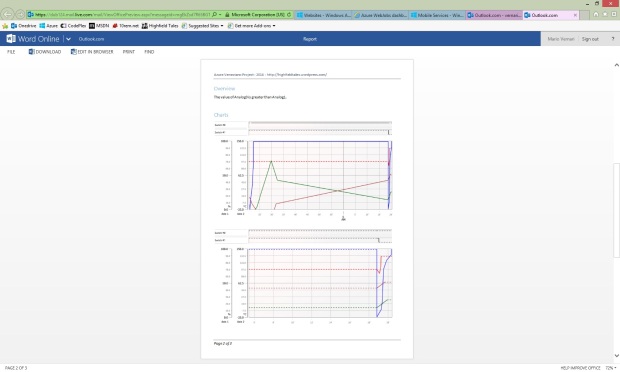
The second page should give a brief overview of what happened at the very beginning. At first glance, the reader should mean WHY the mail has been sent. That’s still pretty easy to do, because it’s just a bunch of “Paragraph” to insert into the current page.

            /**
             * Page 2
             **/
            
            //overview (brief description)
            document.AddHeading1("Overview")
                .AddNormal(rdp.OverviewText)
                .AddBreak(Spire.Doc.Documents.BreakType.LineBreak)
                .AddBreak(Spire.Doc.Documents.BreakType.LineBreak);

Since some lines of text shouldn’t steal much space on the page, I want to place a couple of charts about the most recent evolution of the selected variables.
Later we’ll cover how the chart generation works.

            //charts
            var chart1 = this.CreateChart(
                rdp, 
                rdp.DateTimeBegin, 
                rdp.DateTimeEnd
                );

            var chart2 = this.CreateChart(
                rdp,
                rdp.DateTimeEnd - TimeSpan.FromMinutes(15),
                rdp.DateTimeEnd
                );

            document.AddHeading1("Charts")
                .AddFrameworkElement(chart1)
                .AddBreak(Spire.Doc.Documents.BreakType.LineBreak)
                .AddFrameworkElement(chart2)
                .AddBreak(Spire.Doc.Documents.BreakType.PageBreak);

Here is how the second page looks:

report-2

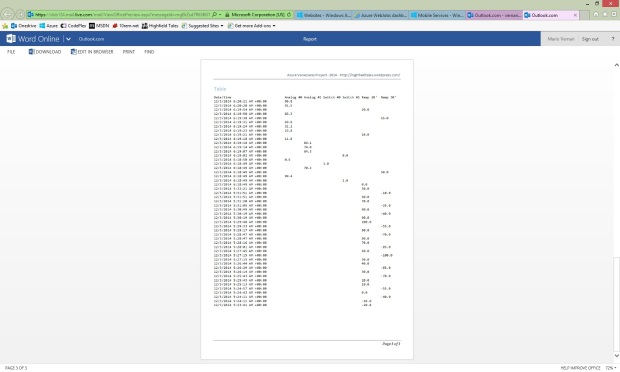
The third (and likely last) page is for the tabular view of the most recent data.
Why showing the same data twice?
Because charts and tables aren’t the same thing: each one has its own pros and cons.

            /**
             * Page 3
             **/

            //data table
            var table = new ReportDataTable();

            {
                //add the date/time column
                var column = new ReportDataTableColumn(
                    "Timestamp",
                    "Date/time",
                    new GridLength(1, GridUnitType.Star)
                    );

                table.Columns.Add(column);
            }

            //add the remaining columns
            foreach(string id in rdp.PlotIds)
            {
                var plot = MyPlotResources.Instance.GetPlot(id);
                var column = new ReportDataTableColumn(
                    plot.InstanceId,
                    plot.Description,
                    new GridLength(0.75, GridUnitType.Pixel)    //inches
                    );

                table.Columns.Add(column);

                if (table.Columns.Count >= 7)
                    break;
            }

            //query the DB for the most recent data collected
            using (var sqlConnection1 = new SqlConnection(SQLConnectionString))
            {
                sqlConnection1.Open();

                var sqlText =
                    "SELECT * FROM highfieldtales.thistory " +
                    "WHERE __createdAt >= @begin AND __createdAt <= @end " +
                    "ORDER BY __createdAt DESC";

                var cmd = new SqlCommand(
                    sqlText,
                    sqlConnection1
                    );

                cmd.Parameters.Add(
                    new SqlParameter("@begin", rdp.DateTimeBegin)
                    );

                cmd.Parameters.Add(
                    new SqlParameter("@end", rdp.DateTimeEnd)
                    );

                using (SqlDataReader reader = cmd.ExecuteReader())
                {
                    while (reader.Read())
                    {
                        var row = new ReportDataTableRow();
                        row["Timestamp"] = reader["__createdAt"].ToString();

                        var colName = (string)reader["name"];
                        row[colName] = string.Format(
                            "{0:F1}",
                            (double)reader["value"]
                            );

                        table.Rows.Add(row);

                        if (table.Rows.Count >= 50)
                            break;
                    }
                }
            }

            document.AddHeading1("Table")
                .AddTable(table);

It’s worthwhile noting that I didn’t use the Table APIs as the library exposes. Again, I wanted to play around the library to face its flexibility.
At the end, I used the “tabulation-technique” and I must admit that the Spire.Doc library is very easy yet very powerful to use.

report-3

The very last thing to do is obviously to save the composed document. As described earlier, there’s no a permanent place where the document is stored, rather it is streamed directly as attachment to the mail.
Here below there is the snippet for both the Word- and the PDF-formats, so that the mail will carry two identical reports, then the user can open with the favorite reader.

            {
                //save the document as Word
                var ms = new MemoryStream();
                document.SaveToStream(
                    ms,
                    Spire.Doc.FileFormat.Docx
                    );

                ms.Position = 0;
                var attachment = new Attachment(
                    ms, 
                    "Report.docx", 
                    "application/vnd.openxmlformats-officedocument.wordprocessingml.document"
                    );

                mail.Attachments.Add(attachment);
            }
            {
                //save the document as PDF
                var ms = new MemoryStream();
                document.SaveToStream(
                    ms,
                    Spire.Doc.FileFormat.PDF
                    );

                ms.Position = 0;
                var attachment = new Attachment(
                    ms, 
                    "Report.pdf", 
                    "application/pdf"
                    );

                mail.Attachments.Add(attachment);
            }

That’s it!

How does it appear on my phone?

I believe it’s funny trying to read a data report on a phone. I mean that even on a relatively small screen you can read the same things as you were on a PC. Well, it’s not as easy as it looks, but I really love it as a start point!

Nice enough!…

Some words about the PDF document creation.

As you know, the Azure Veneziano project has been built against a totally free environment. By the way, the free websites that Azure offers where this WebJob runs, come with some limitation. In this case, the Spire.Doc library require GDI/GDI+ for the PDF generation, and that’s unavailable/unsupported by the Azure free context.
I fully tested the PDF generation in a desktop application, and the result was always perfect. However, if you need the Azure-side PDF generation, I believe there are at least two choices:

  • move the WebJob to a Cloud Service/VM (or any paid context) as suggested here;
  • leverage some online services such as this one, which offers up to 500 documents per months fro free.

The chart generation.

There are plenty of chart libraries on the web, both free and commercial. However, I created my own charting library because I needed several features that they’re hard to find all around. More specifically, my charting library is tailored for our industrial supervisory control systems, where the requirements are very different from, for instance, financial applications.
For the Azure Veneziano project, I took a small fraction of this library, but far enough to render multi-plots, multi-axes, WPF charts.

The usage is pretty simple, although an user may find uselessly verbose the code. Again, that’s because the original library is full-featured, and many functions don’t come easy without a certain dose of source code.

        private FrameworkElement CreateChart(
            ReportDataParameters rdp,
            DateTime dtBeginView,
            DateTime dtEndView
            )
        {
            var uc = new MyChartControl();

            /**
             * CHART MODEL
             **/
            var cm = new ChartModelXY();
            uc.DataContext = cm;

            foreach (string id in rdp.PlotIds)
            {
                cm.Plots.Add(
                    MyPlotResources.Instance.GetPlot(id)
                    );
            }

            //adds the required axes
            foreach (var plot in cm.Plots)
            {
                var cartesian = plot as ChartPlotCartesianBase;
                if (cartesian != null)
                {
                    ChartAxisBase axis;
                    axis = MyAxisResources.Instance.AddWhenRequired(cm, cartesian.HorizontalAxisId);
                    axis = MyAxisResources.Instance.AddWhenRequired(cm, cartesian.VerticalAxisId);
                }
            }

            //update data from source
            using (var sqlConnection1 = new SqlConnection(SQLConnectionString))
            {
                sqlConnection1.Open();

                var sqlText =
                    "SELECT * FROM highfieldtales.thistory " +
                    "WHERE __createdAt >= @begin AND __createdAt <= @end " +
                    "ORDER BY __createdAt ASC";

                var cmd = new SqlCommand(
                    sqlText,
                    sqlConnection1
                    );

                cmd.Parameters.Add(
                    new SqlParameter("@begin", dtBeginView)
                    );

                cmd.Parameters.Add(
                    new SqlParameter("@end", dtEndView)
                    );

                using (SqlDataReader reader = cmd.ExecuteReader())
                {
                    while (reader.Read())
                    {
                        var timestamp = (DateTimeOffset)reader["__createdAt"];

                        var name = (string)reader["name"];
                        var plot = cm.Plots
                            .FirstOrDefault(_ => _.InstanceId == name);

                        var dbl = plot as ChartPlotCartesianLinear;
                        if (dbl != null)
                        {
                            dbl.Points = dbl.Points ?? new List<Point>();

                            var pt = new Point(
                                timestamp.Ticks,
                                (double)reader["value"]
                                );

                            dbl.Points.Add(pt);
                        }
                    }
                }
            }

            var timeline = cm.Axes
                .OfType<ChartAxisTimeline>()
                .FirstOrDefault();

            if (timeline != null)
            {
                timeline.LowestBound = rdp.DateTimeBegin.Ticks;
                timeline.HightestBound = rdp.DateTimeEnd.Ticks;

                timeline.LowerBound = dtBeginView.Ticks;
                timeline.UpperBound = dtEndView.Ticks;
            }

            uc.Measure(new Size(uc.Width, uc.Height));
            uc.Arrange(new Rect(0, 0, uc.Width, uc.Height));

            cm.InvalidateRender();

            return uc;
        }

The only “strange” thing is that we actually DO NOT HAVE a WPF application, but something like a Console application, “hidden” somewhere in the Azure cloud.
However, this isn’t surprising at all, because the above code instantiate an UserControl as container for the chart. Once the chart model setup is done, there’s a “fake” measuring+arranging pass, followed by a final rendering against the control’s face.
The very final step is to capture the visual of this usercontrol and save as a bitmap image (PNG format). This image is inserted in the document as usual

        /// <summary>
        /// Render a visual to a bitmap image
        /// </summary>
        /// <param name="visual"></param>
        /// <param name="width"></param>
        /// <param name="height"></param>
        /// <returns></returns>
        private static System.Drawing.Image SaveImage(
            Visual visual,
            double width,
            double height
            )
        {
            var bitmap = new RenderTargetBitmap(
                (int)width,
                (int)height,
                96,
                96,
                PixelFormats.Pbgra32
                );

            bitmap.Render(visual);

            var image = new PngBitmapEncoder();
            image.Frames.Add(BitmapFrame.Create(bitmap));
            var ms = new System.IO.MemoryStream();
            image.Save(ms);

            return System.Drawing.Image.FromStream(ms);
        }

Thankfully, the free context of Azure supports without any pain the WPF framework.

Conclusions.

As said many times, this article closes the project as essential.
From this time on, there will be some other projects which could extend yet improve the base.
Keep in touch!
Numpad’s decimal-point correction for WPF

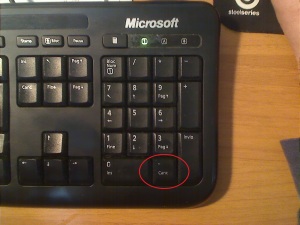
numpadJust a quick-and-dirty solution for solving the tedious problem of the numpad’s decimal-point insertion where the culture require something different than a dot “.”.

The problem.

Many of you, who aren’t using a dot as decimal separator, maybe noticed that the character issued by the numeric-pad is always a doe, regardless the OS settings. In Italy, for instance, we’re using the comma as decimal separator.
You know, if you type the wrong character, the number won’t be recognized as valid (sometimes even worse, because it’s mistaken as valid).
If you try to open Notepad or any raw-input application, you’ll notice that there’s no way to “hack” the Windows settings in order to correctly input the numeric-pad “point” as a comma. By the way, if you enter a number in Microsoft Excel or so, the character is actually a comma.
Looks like the translation is something managed by the application.

It’s not so simple, though.
Imagine to write your own application (WPF in my case), and have a series of textboxes. Whereas a textbox used for entering a number (e.g. most physical units) would be fine having a “translation” to a comma, when another textbox used for an IP-pattern, clearly should *NOT* be translated any time.
Looks like that some countries use a different punctuation for generic numbers and for currency: my “neighbor” friends of Switzerland do use the comma for any number but currency, where the dot is preferred.

The solution.

Here is a solution, but I believe is difficult to satisfy all the developers’ habits. I just opted for a simple attached-property, as “behavior” to any TextBoxBase object, which “intercepts” the Decimal key (the numpad’s DP) and replaces it with the proper one.

namespace DecimalPointCorrectorDemo
{
    public enum DecimalPointCorrectionMode
    {
        /// <summary>
        /// (Default) No correction is applied, and any style
        /// inherited setting may influence the correction behavior.
        /// </summary>
        Inherits,

        /// <summary>
        /// Enable the decimal-point correction for generic numbers.
        /// </summary>
        Number,

        /// <summary>
        /// Enable the decimal-point correction for currency numbers.
        /// </summary>
        Currency,

        /// <summary>
        /// Enable the decimal-point correction for percent-numbers.
        /// </summary>
        Percent,
    }


    /// <summary>
    /// General purpose container for <see cref="System.Windows.Controls.TextBox"/> helpers.
    /// </summary>
    public static class TextBoxHelper
    {

        #region DPA DecimalPointCorrection

        public static readonly DependencyProperty DecimalPointCorrectionProperty = DependencyProperty.RegisterAttached(
            "DecimalPointCorrection",
            typeof(DecimalPointCorrectionMode),
            typeof(TextBoxHelper),
            new UIPropertyMetadata(
                default(DecimalPointCorrectionMode),
                DecimalPointCorrectionChanged
                ));


        public static DecimalPointCorrectionMode GetDecimalPointCorrection(TextBoxBase obj)
        {
            return (DecimalPointCorrectionMode)obj.GetValue(DecimalPointCorrectionProperty);
        }


        public static void SetDecimalPointCorrection(TextBoxBase obj, DecimalPointCorrectionMode value)
        {
            obj.SetValue(DecimalPointCorrectionProperty, value);
        }

        #endregion


        private static void DecimalPointCorrectionChanged(
            object sender,
            DependencyPropertyChangedEventArgs args
            )
        {
            var tbox = (TextBoxBase)sender;

            //remove any existent event subscription
            switch ((DecimalPointCorrectionMode)args.OldValue)
            {
                case DecimalPointCorrectionMode.Number:
                case DecimalPointCorrectionMode.Currency:
                case DecimalPointCorrectionMode.Percent:
                    tbox.PreviewKeyDown -= tbox_PreviewKeyDown;
                    break;
            }

            //subscribe the event handler, whereas necessary
            switch ((DecimalPointCorrectionMode)args.NewValue)
            {
                case DecimalPointCorrectionMode.Number:
                case DecimalPointCorrectionMode.Currency:
                case DecimalPointCorrectionMode.Percent:
                    tbox.PreviewKeyDown += tbox_PreviewKeyDown;
                    break;
            }
        }


        /// <summary>
        /// 
        /// </summary>
        /// <param name="sender"></param>
        /// <param name="e"></param>
        static void tbox_PreviewKeyDown(object sender, KeyEventArgs e)
        {
            //filter the numpad's decimal-point key only
            if (e.Key == System.Windows.Input.Key.Decimal)
            {
                //mark the event as handled, so no further action will take place
                e.Handled = true;

                //grab the originating texbox control...
                var tbox = (TextBoxBase)sender;

                //the current correction mode...
                var mode = TextBoxHelper.GetDecimalPointCorrection(tbox);

                //and the culture of the thread involved (UI)
                var culture = Thread.CurrentThread.CurrentCulture;

                //surrogate the blocked key pressed
                SimulateDecimalPointKeyPress(
                    tbox, 
                    mode, 
                    culture
                    );
            }
        }


        /// <summary>
        /// Insertion of the proper decimal-point as part of the textbox content
        /// </summary>
        /// <param name="tbox"></param>
        /// <param name="mode"></param>
        /// <param name="culture"></param>
        /// <remarks>
        /// Typical "async-void" pattern as "fire-and-forget" behavior.
        /// </remarks>
        private static async void SimulateDecimalPointKeyPress(
            TextBoxBase tbox,
            DecimalPointCorrectionMode mode,
            CultureInfo culture
            )
        {
            //select the proper decimal-point string upon the context
            string replace;
            switch (mode)
            {
                case DecimalPointCorrectionMode.Number:
                    replace = culture.NumberFormat.NumberDecimalSeparator;
                    break;

                case DecimalPointCorrectionMode.Currency:
                    replace = culture.NumberFormat.CurrencyDecimalSeparator;
                    break;

                case DecimalPointCorrectionMode.Percent:
                    replace = culture.NumberFormat.PercentDecimalSeparator;
                    break;

                default:
                    replace = null;
                    break;
            }

            if (string.IsNullOrEmpty(replace) == false)
            {
                //insert the desired string
                var tc = new TextComposition(
                    InputManager.Current,
                    tbox,
                    replace
                    );

                TextCompositionManager.StartComposition(tc);
            }

            await Task.FromResult(false);
        }

    }
}

The code is rather simple, so I think would be useless chatting more.
The only worthwhile point is regarding the “async” pattern in the key-replace function. I just wanted to leave the originating event (PreviewKeyDown) a bit of time to finish before adding another (possible) event. Honestly, I don’t know whether that’s really necessary: the async-await pattern comes easy and reliable, so I prefer to keep the code safer. Feel free to improve the it.

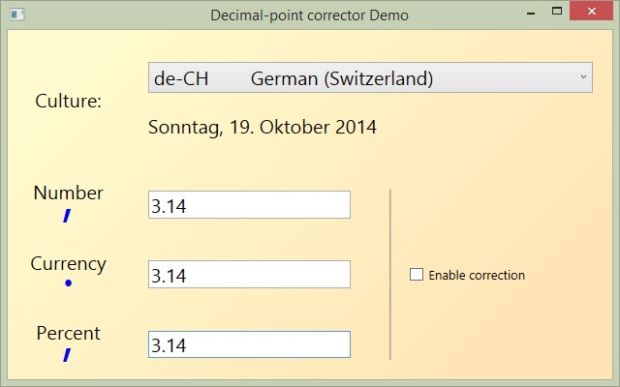
correction-off

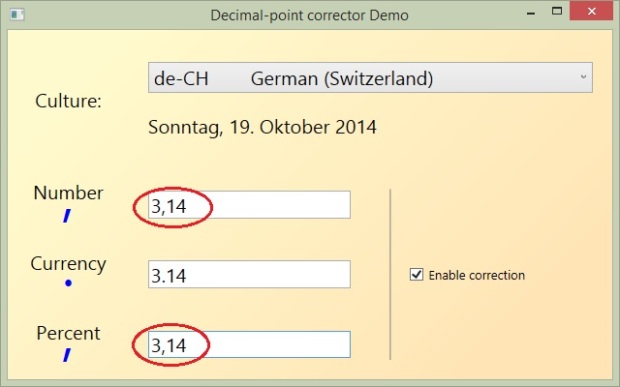
correction-on

The complete demo solution source code can be downloaded here.

This code has been tested widely enough, including on the Windows 8 on-screen touch-keyboard.
Enjoy!

A WPF StackPanel-surrogate with shared-sizing scope ability

Here is a simple trick for simulating the shared-sizing feature of the WPF Grid even in a StackPanel fashion.

demo

Basically, you can have several panels, each one in a separate visual fragment, and “synchronize” their children height (or width, when horizontally-oriented).
A short video explains better than thousands of words.

The solution is pretty simple. Since the Grid already offers such a feature, the trick is leveraging it instead a “real” StackPanel. Otherwise, the mechanism for managing the shared-size scopes is rather complex. As for “complex” I mean that you should keep all the scrolling and virtualization features which is part of a StackPanel, and that’s rather complex.
The resulting StackPanel-surrogate code is very simple:

    /// <summary>
    /// Represent a StackPanel surrogate whose children width/height can be
    /// shared with other homogeneous panel's children
    /// </summary>
    public class StackPanel3S
        : Grid
    {
        /// <summary>
        /// Gets or sets a value that identifies the panel as a member 
        /// of a defined group that shares sizing properties.
        /// </summary>
        public string SharedSizeGroup { get; set; }


        #region DP Orientation

        /// <summary>
        /// Identifies the StackPanelEx.Orientation dependency property.
        /// </summary>
        public static readonly DependencyProperty OrientationProperty = DependencyProperty.Register(
            "Orientation",
            typeof(Orientation),
            typeof(StackPanel3S),
            new FrameworkPropertyMetadata(
                Orientation.Vertical,
                FrameworkPropertyMetadataOptions.AffectsMeasure,
                (obj, args) =>
                {
                    var ctl = (StackPanel3S)obj;
                    ctl.OrientationChanged(args);
                }));


        /// <summary>
        /// Gets or sets a value that indicates the dimension by which child elements are stacked.
        /// </summary>
        public Orientation Orientation
        {
            get { return (Orientation)GetValue(OrientationProperty); }
            set { SetValue(OrientationProperty, value); }
        }

        #endregion


        private void OrientationChanged(
            DependencyPropertyChangedEventArgs args
            )
        {
            //flush any current row/column definition
            this.RowDefinitions.Clear();
            this.ColumnDefinitions.Clear();
        }


        protected override Size MeasureOverride(Size constraint)
        {
            //retrieve the number of children
            int count = this.InternalChildren.Count;

            if (this.Orientation == System.Windows.Controls.Orientation.Vertical)
            {
                //add the missing row-defintions
                for (int i = this.RowDefinitions.Count; i < count; i++)
                {
                    this.RowDefinitions.Add(
                        new RowDefinition()
                        {
                            Height = GridLength.Auto,
                            SharedSizeGroup = this.SharedSizeGroup + "__R" + i
                        });
                }

                //remove the unnecessary row-definitions
                for (int i = this.RowDefinitions.Count - 1; i >= count; i--)
                {
                    this.RowDefinitions.RemoveAt(i);
                }

                //assing a progressive index to each child
                for (int i = 0; i < count; i++)
                {
                    UIElement child;
                    if ((child = this.InternalChildren[i]) != null)
                    {
                        Grid.SetRow(child, i);
                    }
                }
            }
            else
            {
                //add the missing column-defintions
                for (int i = this.ColumnDefinitions.Count; i < count; i++)
                {
                    this.ColumnDefinitions.Add(
                        new ColumnDefinition()
                        {
                            Width = GridLength.Auto,
                            SharedSizeGroup = this.SharedSizeGroup + "__C" + i
                        });
                }

                //remove the unnecessary column-definitions
                for (int i = this.ColumnDefinitions.Count - 1; i >= count; i--)
                {
                    this.ColumnDefinitions.RemoveAt(i);
                }

                //assing a progressive index to each child
                for (int i = 0; i < count; i++)
                {
                    UIElement child;
                    if ((child = this.InternalChildren[i]) != null)
                    {
                        Grid.SetColumn(child, i);
                    }
                }
            }

            //yield the default measuring pass
            return base.MeasureOverride(constraint);
        }

    }

Enjoy!

Cet MicroWPF is now on CodePlex

After loooooooong time, the Cet MicroWPF repository is publicly available on CodePlex.
The awaited release comes with a (decent) tutorial, where you may follow step-by-step how to create a nice graphical UI for your Netduino. Many more is still to do, but of sure there are enough stuffs to have some fun!

My Snapshot18

Stay tuned!

Netduino + FT800 Eve = MicroWPF

The spare time is few, but step by step the target is getting closer.
It’s a been I’ve started playing around the FTDI FT800 Eve board, and it must admit it is awesome. If you need a quick solution to add a small touch display to your *duino board, the Eve is something you should consider.

EVE image

You know, I love Netduino and C#. That’s because I chose to play with the display using Netduino (Plus 2), and honestly I’d expected a pretty bad performance. Instead, the graphic engine of the Eve can be easily driven via SPI from any board. That is, the SPI on Netduino is fast, very fast.

My goal is creating a small library for helping many users to create small and funny home/hobby projects with the Netduino and the Eve display boards. Since I love the classic WPF, how could I avoid to inspire from them?

Micro WPF

If you know WPF, many concepts would come easier. Otherwise, I recommend to take a look to the documentation, tutorials and whatever you want. Even if you don’t harm with a PC, rather with the Windows Store/Phone APIs, the approach here isn’t too far from.
The “WPF” term for a simple Netduino is clearly abused. Here is just the visual approach, the XAML-like approach to create the UI, and -yes- the same ability to create your own controls: MeasureOverride and ArrangeOverride.
That’s not all.
If you have any visual application in mind with Netduino+Eve (e.g. a climate control, IoT client, etc), then probably you’d need some kind of navigation service across several pages. That’s the most modern UI experience, on every device: PC, tablets, and phones.

I still don’t write what the library will offer, because it’s just something made for fun: for helping hobbists and even students working with a UI on a such small board as Netduino is.
For sure, there are NOT (nor in the future):

  • data binding
  • XAML parsing (the tree has to be created programmatically)
  • styling
  • the remaining 99.99% of regular WPF…

An example of layout

The most versatile yet complex layout control is the Grid, but it seems working fine.
Let’s take this sample XAML:

<Page x:Class="WpfApplication2.Page1"
      xmlns="http://schemas.microsoft.com/winfx/2006/xaml/presentation"
      xmlns:x="http://schemas.microsoft.com/winfx/2006/xaml"
      xmlns:mc="http://schemas.openxmlformats.org/markup-compatibility/2006" 
      xmlns:d="http://schemas.microsoft.com/expression/blend/2008" 
      mc:Ignorable="d" 
      d:DesignHeight="300" d:DesignWidth="300"
	Title="Page1">

    <Grid>
        <Grid.ColumnDefinitions>
            <ColumnDefinition Width="150" />
            <ColumnDefinition Width="*" />
            <ColumnDefinition Width="Auto" />
        </Grid.ColumnDefinitions>

        <Grid.RowDefinitions>
            <RowDefinition Height="*" />
            <RowDefinition Height="2*" />
            <RowDefinition Height="Auto" />
        </Grid.RowDefinitions>

        <StackPanel
            Grid.Row="0"
            Grid.Column="0"
            x:Name="R0C0"
            Background="Blue"
            />

        <StackPanel
            Grid.Row="0"
            Grid.Column="1"
            x:Name="R0C1"
            Background="DarkGreen"
            />

        <StackPanel
            Grid.Row="0"
            Grid.Column="2"
            x:Name="R0C2"
            Background="Red"
            >
            <Button
                Content="Caption"
                Width="120"
                Height="30"
                Margin="10,5"
                HorizontalAlignment="Center"
                x:Name="B0"
                />
        </StackPanel>


        <StackPanel
            Grid.Row="1"
            Grid.Column="0"
            Grid.ColumnSpan="2"
            x:Name="R1C0"
            Background="LightPink"
            />


        <StackPanel
            Grid.Row="2"
            Grid.Column="1"
            Grid.ColumnSpan="2"
            x:Name="R2C1"
            Background="MediumSlateBlue"
            >
            <Button
                Content="Caption"
                Width="120"
                Height="30"
                Margin="10,5"
                HorizontalAlignment="Center"
                x:Name="B2"
                />
        </StackPanel>

    </Grid>
</Page>

On the regular WPF the result is the following:

sample-wpf

Now, let’s see how to write the same thing on Netduino:

    public class DemoPage2 : PageBase
    {
        protected override void OnCreate(FT800Device dc)
        {
            var btn_prev = new WidgetButton() { Margin = new Thickness(10, 5), Text = "Prev" };
            btn_prev.Click += new EventHandler(btn_prev_Click);

            var btn_next = new WidgetButton() { Margin = new Thickness(10, 5), Text = "Next" };
            btn_next.Click += new EventHandler(btn_next_Click);
            btn_next.HAlign = HorizontalAlignment.Center;

            var grid = new WidgetGridContainer();
            grid.Name = "GRID";

            grid.AddColumnDefinition(150);
            grid.AddColumnDefinition(1, GridUnitType.Star);
            grid.AddColumnDefinition(1, GridUnitType.Auto);

            grid.AddRowDefinition(1, GridUnitType.Star);
            grid.AddRowDefinition(2, GridUnitType.Star);
            grid.AddRowDefinition(1, GridUnitType.Auto);

            {
                var ctr = new WidgetStackContainer();
                ctr.Name = "R0C0";
                ctr.Background = Colors.Blue;
                grid.SetRowCol(ctr, 0, 0);
                grid.Children.Add(ctr);

                ctr.Children.Add(btn_prev);
            }
            {
                var ctr = new WidgetStackContainer();
                ctr.Name = "R0C1";
                ctr.Background = Colors.DarkGreen;
                grid.SetRowCol(ctr, 0, 1);
                grid.Children.Add(ctr);
            }
            {
                var ctr = new WidgetStackContainer();
                ctr.Name = "R0C2";
                ctr.Background = Colors.Red;
                grid.SetRowCol(ctr, 0, 2);
                grid.Children.Add(ctr);

                ctr.Children.Add(
                    new WidgetButton() { Name = "B0", Margin = new Thickness(10, 5) }
                    );
            }
            {
                var ctr = new WidgetStackContainer();
                ctr.Name = "R1C0";
                ctr.Background = Colors.LightPink;
                grid.SetRowCol(ctr, 1, 0, 1, 2);
                grid.Children.Add(ctr);
            }
            {
                var ctr = new WidgetStackContainer();
                ctr.Name = "R2C1";
                ctr.Background = Colors.MediumSlateBlue;
                grid.SetRowCol(ctr, 2, 1, 1, 2);
                grid.Children.Add(ctr);

                ctr.Children.Add(btn_next);
            }

            this.Content = grid;
        }

        void btn_prev_Click(object sender, EventArgs e)
        {
            NavigationService.Instance.GoBack();
        }

        void btn_next_Click(object sender, EventArgs e)
        {
            NavigationService.Instance.Navigate(new DemoPage3());
        }
    }

That leads the following snapshot:

My Snapshot5

NOTE: by live the display shows the colors correctly. However, the picture taken renders a bad result.

Widgets, widgets, widgets…

The Eve board is very well designed, because it’s plenty of useful widgets. I don’t believe you’d need something different from the provided.
At the moment of writing, the Netduino library supports:

  • (normal) Button
  • ToggleButton
  • TextBlock
  • Slider
  • Dial

and, as for the layout control:

  • StackPanel
  • Grid

As long the spare time helps me, I will try to add some other useful component as the TextBox and the Image.

Yet some screens generated by the Netduino and the FT800 Eve board.
WP_000595

My Snapshot4

My Snapshot3

My Snapshot7

Source code

I will release a beta release soon.

WPF editable ComboBox and its weird bug

This is a double-purpose post: a simple hack around the WPF ComboBox, and a subtle bug in it.
The short video explains both the problems way better than my words could do.

Most of the times, I use the ComboBox as a simple drop-down list. That works perfectly and that’s why I never bumped against the problems around.
This time I needed a real ComboBox, that is the ability to select from a drop-down list as always, but with the editable box as well. More precisely, I wanted the following behaviors:

  1. the user can drop the list and select any item (that’s the usual feature)
  2. the user can type in an existent item or a new one
  3. as the user type in the selection box, the drop-down should open
  4. (future) the drop-down list should be filtered upon the actual text typed in the selection box

The first two points are already available in the standard ComboBox control, while the fourth is just a wish for the (near) future. The problems arose with the third point, because the simplest yet intuitive way I used yielded a nice exception!

The base for the test.

Nothing fancy here: just a collection of objects, very simple. The classic “Person” with an “ID” (why didn’t I named so?):

    public class MyItem
    {
        public string Code { get; set; }
        public string Description { get; set; }

        public override string ToString()
        {
            return this.Code;
        }
    }

The data-set generation looks as follows:

    public partial class App : Application
    {
        public IEnumerable<MyItem> ItemCollection { get; private set; }


        protected override void OnStartup(StartupEventArgs e)
        {
            var nomi = new[] { "Mario", "Carlo", "Lucia", "Elena", "Giorgio", "Nicoletta" };
            var cognomi = new[] { "Bianchi", "Rossi", "Verdi", "Brambilla", "Scarpa", "Zennaro" };

            var items = new List<MyItem>();

            for (int i = 0; i < cognomi.Length; i++)
            {
                for (int k = 0; k < nomi.Length; k++)
                {
                    var mi = new MyItem();
                    mi.Code = (i * 10 + 11 + k).ToString();
                    mi.Description = nomi[k] + " " + cognomi[i];
                    items.Add(mi);
                }
            }

            this.ItemCollection = items;

            base.OnStartup(e);
        }
    }

The deal is populating the combo-box with such a data-set, then testing for a numeric input so that the drop-down part should arrange accordingly. As a (future) bonus, the list should be filtered upon the actual number. That should facilitate the user when he/she has to enter a non-existent ID.
On the XAML-side the base is something like this:

<Window 
    x:Class="ComboEditableDemo.Window1"
    xmlns="http://schemas.microsoft.com/winfx/2006/xaml/presentation"
    xmlns:x="http://schemas.microsoft.com/winfx/2006/xaml"
    xmlns:local="clr-namespace:ComboEditableDemo"
    Title="Window1 - buggy" 
    Height="300" 
    Width="400"
    x:Name="This"
    >
    
    <Window.Resources>
        
        <DataTemplate x:Key="dtplItem">
            <StackPanel
                Orientation="Horizontal"
                >
                <TextBlock Text="{Binding Path=Code}" Margin="0,0,8,0" />
                <TextBlock Text="{Binding Path=Description}" />
            </StackPanel>
        </DataTemplate>
        
    </Window.Resources>
    
    <Grid>
        <ComboBox
            x:Name="Cbo1"
            Width="250"
            Height="30"
            IsEditable="True"
            StaysOpenOnEdit="True"
            ItemTemplate="{StaticResource dtplItem}"
            FontSize="18"
            SelectedItem="{Binding Path=CurrentItem, ElementName=This}"
            Text="{Binding Path=CurrentText, ElementName=This}"
            . . .
            >
        </ComboBox>
    </Grid>
</Window>

Finally, here is a possible way to link the data-set to a ComboBox:

            this.Cbo1.ItemsSource = ((App)App.Current).ItemCollection;

First attempt: the bug.

The first attempt was done via a simple styling of the ComboBox, since it exposes two interesting properties:

The style was defined as follows:

        <Style x:Key="ComboStyleKey" TargetType="ComboBox">
            <Setter Property="StaysOpenOnEdit" Value="True" />

            <Style.Triggers>
                <Trigger Property="IsSelectionBoxHighlighted" Value="True">
                    <Setter Property="IsDropDownOpen" Value="True" />
                </Trigger>
            </Style.Triggers>
        </Style>

Although everything seemed going fine (no errors), once you click with the left mouse button in the selection box, a nasty “StackOverflow” exception is suddenly raised. No matter whether the application is creates as “Debug” or “Release”: the error seems very stable.

stack-overflow

At first glance it’s not clear why it happens, and not how to solve or even around it. Also because the actual exception looks as raised in a very deep layer, below the managed. However, that’s just what I suppose.
The second attempt gave me a clearer idea.

Second attempt: better, but not solved yet.

The second attempt was focus on find any (decent) workaround to the bug. Internet didn’t give more help, so I had to find something reliable to make the ComboBox working.
The hint was just on the “stack overflow”, because most of the times it’s a recursive problem. Again, many times you generate such a exception when there are circular calls, that fill the stack sooner. So, let’s give the UI a “breath”: a small delay, so that a routine can complete before actually calling the next one.
Here is the trick:

    public class ComboBox2
        : ComboBox
    {
        protected override void OnPropertyChanged(DependencyPropertyChangedEventArgs e)
        {
            base.OnPropertyChanged(e);

            if (e.Property.Name == "IsSelectionBoxHighlighted" &&
                this.IsEditable &&
                this.IsSelectionBoxHighlighted &&
                this.IsDropDownOpen == false &&
                this.StaysOpenOnEdit)
            {
                this.OpenDropDown();
            }
        }


        private async void OpenDropDown()
        {
            await Task.Delay(200);
            this.IsDropDownOpen = true;
        }

    }

Well, the exception wasn’t raised any more, but…AW!…the interaction result was not the expected.
Since the drop-down part is actually a borderless “Window” object, it tries to capture the mouse, at least until some kind of mouse action is worthwhile to be captured. As soon, the mouse click outside its client area, the down-down window closes, but the click is “lost”. That is, there’s no (easy) way to interact with the “real” window, so even an attempt to close the application looks impossible.

Despite this trick did not solved the problem, at least it clears *why* the exception is raised in the previous scenario. As soon the selection box is highlighted, the trigger starts the opening of the drop-down. However, the opening of this new child-window would captures the user-input, moving the focus off the selection box. However, the focus is restored to the selection box, and the condition will trigger again the drop-down opening.

Third attempt: all right!

The final solution isn’t much different than the previous attempt: simply avoid the “IsSelectionBoxHighlighted” property…

    public class ComboBox3
        : ComboBox
    {

        protected override void OnKeyDown(KeyEventArgs e)
        {
            base.OnKeyDown(e);

            if (this.IsEditable &&
                this.IsDropDownOpen == false &&
                this.StaysOpenOnEdit)
            {
                this.IsDropDownOpen = true;
            }
        }

    }

Conclusion.

You may download the source for the demo application here.

Hacking the WPF GridView – Two more features

This is another post about the hacking of the standard WPF GridView typically used with(in) the ListView. If you missed anything about my previous three article on it, please have a look here.
By using the hacked component in some real projects, I discovered that something was missing, and something else could be improved. In particular, here are a couple of features making my GridViewEx almost complete (well…not perfect yet!)

XAML-defined columns.

The GridViewEx approach was based on a GridViewColumn wrapper. The host application should add as many wrappers as needed, and the real columns will be created (and synchronized) accordingly. This approach is basically the MVVM pattern, and yields the ability to manipulate the visual columns with ease and flexibility.
However, that’s not always an acceptable usage: the XAML-way to define templates and styles is far better than the classic code. Well, I wished to find a solution as a compromise between the MVVM flexibility and the XAML power.
The solution I chose is pretty easy: an extra columns “back” synchronization, which operates when there’s no ambiguity between the XAML and the MVVM collections content. The legacy MVVM columns management is still alive and full compatible. However, when the MVVM is bound “empty” the XAML columns definition will be taken in account.
Here follows the code added to the GridViewEx class.

        /// <summary>
        /// Provides the backward-alignment from the XAML-defined columns
        /// to the wrapper collection source.
        /// That should happen only when the source collection is empty,
        /// and there are XAML-column defined in the view.
        /// </summary>
        /// <param name="source"></param>
        private void BackAlign(Collection<GridViewColumnWrapper> source)
        {
            if (source.Count == 0 &&
                this.Columns.Count > 0)
            {
                foreach (GridViewColumn column in this.Columns)
                {
                    var wrapper = new GridViewColumnWrapper();
                    wrapper.Header = column.Header;
                    wrapper.Width = column.Width;
                    wrapper.IsVisible = true;
                    wrapper.ColumnHash = column.GetHashCode();
                    source.Add(wrapper);

                    //setup the column
                    this.SetupColumn(wrapper, column);
                }
            }
        }

The above method is called once only, at the moment of the binding to a new wrapper collection. As the code shows, if there’s no wrappers, the defined XAML GridViewColumn are automatically converted to wrappers. Hereinafter the game plays as usual.

The column’s setup has been moved off the existent Align method, to a dedicated one in order to be used both in the forward- and in the back-alignment of the columns’ collection.

        /// <summary>
        /// Prepares the column binding it to the wrapper
        /// </summary>
        /// <param name="wrapper"></param>
        /// <param name="col"></param>
        private void SetupColumn(
            GridViewColumnWrapper wrapper,
            GridViewColumn col)
        {
            //creates the behavior for the length animation
            var bvr = new LengthAnimationBehavior(GridViewColumn.WidthProperty);
            Interaction.GetBehaviors(col).Add(bvr);
            bvr.ControlledValueChanged += bvr_ControlledValueChanged;

            //binds the nominal width of the column to the behavior
            BindingOperations.SetBinding(
                bvr,
                LengthAnimationBehavior.NominalLengthProperty,
                new Binding("Width")
                {
                    Source = wrapper,
                });

            //also binds the visibility to the behavior
            BindingOperations.SetBinding(
                bvr,
                LengthAnimationBehavior.IsVisibleProperty,
                new Binding("IsVisible")
                {
                    Source = wrapper,
                });

            //now finally enables the animation
            bvr.IsAnimationEnabled = true;
        }

To test the new feature, the window’s XAML page has been simplified as follows.

<Window 
    x:Class="ListViewHacking.Window1"
    xmlns="http://schemas.microsoft.com/winfx/2006/xaml/presentation"
    xmlns:x="http://schemas.microsoft.com/winfx/2006/xaml"
    xmlns:local="clr-namespace:ListViewHacking"
    Title="ListView hacking demo" 
    Height="480" Width="900"
    WindowStartupLocation="CenterOwner"
    FontSize="14"
    Background="{StaticResource BG}"
    >
    
    
    <Window.Resources>
        
        <DataTemplate x:Key="dtpl1">
            <TextBlock
                Text="{Binding Path=FirstName}"
                />
        </DataTemplate>


        <DataTemplate x:Key="dtpl2">
            <TextBlock
                Text="{Binding Path=LastName}"
                />
        </DataTemplate>


        <DataTemplate x:Key="dtpl3">
            <TextBlock
                Text="{Binding Path=City}"
                />
        </DataTemplate>

    </Window.Resources>
    
        
    <Grid
        Margin="50,40"
        >
        <ListView
            ItemsSource="{Binding Path=People, Source={x:Static local:App.Current}}"
            x:Name="lvw1"
            >
            <ListView.Resources>
                <local:ColumnHeaderEnableConverter x:Key="cv1" />
                <Style TargetType="{x:Type GridViewColumnHeader}">
                    <Setter Property="IsEnabled" Value="{Binding Path=ActualWidth, RelativeSource={RelativeSource Mode=Self}, Converter={StaticResource cv1}}" />
                </Style>
            </ListView.Resources>

            <ListView.View>
                <local:GridViewEx
                    AllowsColumnReorder="False"
                    ColumnsSource="{Binding Path=.}"
                    >
                    <GridViewColumn Header="FirstName" Width="150" CellTemplate="{StaticResource dtpl1}" />
                    <GridViewColumn Header="LastName" Width="150" CellTemplate="{StaticResource dtpl2}" />
                    <GridViewColumn Header="City" Width="150" CellTemplate="{StaticResource dtpl3}" />
                </local:GridViewEx>
            </ListView.View>
        </ListView>
        
    </Grid>
</Window>

Now, let’s switch to the trickier problem.

Per-column defined cell content alignment.

Sometime is useful to define the alignment (horizontal and vertical) of a cell content. Unfortunately the native GridView offers no help about this feature, and the only way to control the cell behavior is via the ListViewItem styling.
To be clear, none of the below approaches will align the text content to the right edge of the respective cells.

        <DataTemplate x:Key="dtpl1">
            <TextBlock
                Text="{Binding Path=FirstName}"
                Background="Yellow"
                HorizontalAlignment="Right"
                />
        </DataTemplate>
        
        <DataTemplate x:Key="dtpl2">
            <TextBlock
                Text="{Binding Path=LastName}"
                Background="Yellow"
                TextAlignment="Right"
                />
        </DataTemplate>

lh5-1

That’s because the template-created content is actually hosted in a ContentPresenter object. The GridView creates as many ContentPresenters as the columns are, and the user’s control over these components is very limited. Please note that the ContentPresenters are created always but when you bind the cell’s content via a simpler DisplayMemberBinding. In that case, a simple TextBlock is created instead.
As said, the only way to control the alignment of the hosted ContentPresenters is by settings the HorizontalContentAlignment (or VerticalContentAlignment) in the ListViewItem style. In other words, you could style the rows as follows:

        <ListView
            ItemsSource="{Binding Path=People, Source={x:Static local:App.Current}}"
            x:Name="lvw1"
            >
            <ListView.Resources>
                <local:ColumnHeaderEnableConverter x:Key="cv1" />
                <Style TargetType="{x:Type GridViewColumnHeader}">
                    <Setter Property="IsEnabled" Value="{Binding Path=ActualWidth, RelativeSource={RelativeSource Mode=Self}, Converter={StaticResource cv1}}" />
                </Style>

                <!-- alter the items (rows) implicit style -->
                <Style TargetType="ListViewItem">
                    <Setter Property="HorizontalContentAlignment" Value="Right" />
                </Style>
            </ListView.Resources>

            <ListView.View>
                <local:GridViewEx
                    AllowsColumnReorder="False"
                    ColumnsSource="{Binding Path=.}"
                    >
                    <GridViewColumn Header="FirstName" Width="150" CellTemplate="{StaticResource dtpl1}" />
                    <GridViewColumn Header="LastName" Width="150" CellTemplate="{StaticResource dtpl2}" />
                    <GridViewColumn Header="City" Width="150" CellTemplate="{StaticResource dtpl3}" />
                </local:GridViewEx>
            </ListView.View>
        </ListView>

The result is as expected, but involves all the cells, without any control on a specific column.

lh5-2

This behavior is predefined in the GridViewRowPresenter, which is part of the default rows styling. The most straightforward way to take the control over the row’s cell presenters is creating (or deriving) a custom GridViewRowPresenter, then re-styling the ListViewItem. However, I would avoid to touch any of the Windows’ default styles.

The solution I used takes advantage of a couple of Attachable DependencyProperty: one for each alignment orientation.
The attached DP comes in aid because it can be stuck anywhere in the logical tree, and that’s helping to reach the hidden visual element. The basic idea is right on the attaching event of the DP: at that time the visual tree is walked up, up to the “original” GridViewRowPresenter. The immediate-child of that presenter is the sought ContentPresenter, and the alignment properties are fully exposed.

        #region DPA HorizontalContainerAlignment

        public static readonly DependencyProperty HorizontalContainerAlignmentProperty = DependencyProperty.RegisterAttached(
            "HorizontalContainerAlignment",
            typeof(HorizontalAlignment),
            typeof(GridViewEx),
            new UIPropertyMetadata(
                default(HorizontalAlignment),
                HorizontalContainerAlignmentChanged
                ));


        public static HorizontalAlignment GetHorizontalContainerAlignment(DependencyObject obj)
        {
            return (HorizontalAlignment)obj.GetValue(HorizontalContainerAlignmentProperty);
        }


        public static void SetHorizontalContainerAlignment(DependencyObject obj, HorizontalAlignment value)
        {
            obj.SetValue(HorizontalContainerAlignmentProperty, value);
        }


        private static void HorizontalContainerAlignmentChanged(object sender, DependencyPropertyChangedEventArgs args)
        {
            var current = sender as DependencyObject;
            int levels = 10;

            while (current != null && levels-- > 0)
            {
                var next = VisualTreeHelper.GetParent(current);
                if (next is GridViewRowPresenter)
                {
                    var cp = current as ContentPresenter;
                    if (cp != null)
                    {
                        cp.HorizontalAlignment = (HorizontalAlignment)args.NewValue;
                    }
                    break;
                }

                current = next;
            }
        }

        #endregion

And here is how to apply it:

        <DataTemplate x:Key="dtpl1">
            <TextBlock
                Text="{Binding Path=FirstName}"
                Background="Yellow"
                local:GridViewEx.HorizontalContainerAlignment="Stretch"
                />
        </DataTemplate>


        <DataTemplate x:Key="dtpl2">
            <TextBlock
                Text="{Binding Path=LastName}"
                Background="Yellow"
                local:GridViewEx.HorizontalContainerAlignment="Right"
                />
        </DataTemplate>


        <DataTemplate x:Key="dtpl3">
            <TextBlock
                Text="{Binding Path=City}"
                Background="Yellow"
                />
        </DataTemplate>

Finally, the visual result is the following.
lh5-3

Conclusions.

Hacking. Far funnier than digging around for hours looking for a ready-to-go solution, which (we do know) does not exist.
I loved this series of hacking around the GridView, because it showed me that even a very simple component as the (ListView plus the) GridView is, yields a lot of power by just learning a bit on how its core works.

Feel free to download the demo source here.

Hacking the WPF GridView – Final revised release

This is the third (and supposed last) article on how to hack the GridView (ListView) of the WPF.

To tell the truth, this post was yes planned, but just for explaining a subtle issue still present in the past release. However, after playing a while with that source, I noticed that another severe issue: a potential memory-leak when the column manager is not disposed together with the (Grid)view.
That caused a dramatic changing of the code, but luckily it comes in a simpler way that the previous one.

The subtle issue.

Let’s have a peek at the known issue, firstly.
It’s about the columns’ header, which allows the resizing of the width by dragging the buttons separator. That’s quite normal, but the issue came out when I tried to resize the latest visible column, whereas the next was hidden. In the following video the issue is very clear:

So, why that happens, and how to solve it?
I had a little effort on inspecting the problem, because the logical tree exposes the GridViewColumn instances, but the visual tree is rather different. Moreover, the embedded WPF visualizer in the Visual Studio (even the Ultimate version) is pretty limited and does not offer enough help in such a situation.
Finally, I decided to try the XAML Spy tool. It looks astonishingly, with a very modern yet attractive look, but that isn’t a trap.

Inspecting the application with XAML Spy.

IMHO, the best feature the XAML Spy tool has is the ability to inspect any running process; of course, it has to be any of the supported technologies, but with WPF, Silverlight, Windows Phone and Windows Store, I think you’ll cover anything but the web.
Once run, the spy asks for the target application to attach to. If the troubled app is already started, it’s pretty straightforward finding it among the “running processes”. In case you don’t see it at first glance, just refresh the Spy’s page.

xamlspy-1

Press “attach to process” when the target process has been selected.

Immediately, you’ll notice two things:

  • the XAML Spy app will turn to the inspection page, where many tools are available, and
  • a special blue tag will be shown in the top of the target window’s viewport.

xamlspy-2

It’s a drop-down menu (or whatever you want to call it), which offers a series of useful functions.

xamlspy-3

I must admit that I was shocked by seeing that I can enable a basic ruler: useful for sure for many pixel-perfect artworks, of any every-day app. Anyway, it is just a delightful feature of the XAML Spy, and not what we actually need for the inspection.

xamlspy-4

In the Visual Studio tree viewer, you have to scan the visual tree “by yourself”, in the sense that there’s no easing on a certain visual element. Sometime, on third-party components, you actually don’t have any idea on what to look for. Finally, when the tree is huge, the searching is more than a challenge.

Instead, the GUI inspection has been made easy with the XAML Spy. Just move the mouse over the desired (or suspected) point, and a dashed border will highlight the related visual element. Of course you can’t do everything, but it’s surely a dramatic quicker way to find the hot spot.

xamlspy-5

So, the goal is understanding why dragging the rightmost column header separator will reveal the hidden column. The visual inspection (see below) indicates that the sizing button is still available even the column has been hidden.

xamlspy-6

At this point, the simplest way to get around this behavior would be disabling the whole column (visual) fragment, but…will be a real solution.

One time more, the XAML Spy allows to change the value of a property directly by the aim of the left pane, which is a well-known property-grid. Let’s say that only a subset of the available properties can be modified at runtime with this feature. That’s because the WPF code, which turns to “frozen” many objects (especially whose created by a template-mechanism), thus no more modifiable externally.

xamlspy-7

So, turning the GridViewColumnHeader as NOT enabled (i.e. IsEnabled = False) is trivial, as well as verifying the result in no time.

xamlspy-8

The trick can be applied, so the only task to do now is implementing the mechanism in some way.
This is not complex at all, though. A simple converter will do the job: as soon the column width is larger than some pixel, it will disable automatically the whole column itself.

Here follows the converter’s code:

    /// <summary>
    /// This converter targets a column header,
    /// in order to disable it when its width
    /// is close to zero
    /// </summary>
    public class ColumnHeaderEnableConverter
        : IValueConverter
    {
        public object Convert(
            object value, 
            Type targetType, 
            object parameter, 
            System.Globalization.CultureInfo culture)
        {
            var width = (double)value;
            return width >= 3.0;
        }


        public object ConvertBack(
            object value, 
            Type targetType, 
            object parameter, 
            System.Globalization.CultureInfo culture)
        {
            throw new NotImplementedException();
        }

    }

Then here is how to apply in the XAML:

               ...
        <ListView
            ItemsSource="{Binding Path=People, Source={x:Static local:App.Current}}"
            Grid.Row="1"
            x:Name="lvw1"
            >
            <ListView.Resources>
                <local:ColumnHeaderEnableConverter x:Key="cv1" />
                <Style TargetType="{x:Type GridViewColumnHeader}">
                    <Setter Property="IsEnabled" Value="{Binding Path=ActualWidth, RelativeSource={RelativeSource Mode=Self}, Converter={StaticResource cv1}}" />
                </Style>
            </ListView.Resources>

            <ListView.View>
               ...

The code rewriting.

As stated, the code presented on the past article has dramatically changed, due a potential memory-leak.
Let’s say that a real memory-leak won’t happen, just because the WPF underlying code checks for the proper GridViewColumn instantiation, and throws an exception. However, the issue is severe enough to take in account, and find a workaround.

The problem faces the inability to reuse the same GridViewColumn more than once, in any GridView context. Once you insert it in a view, either you remove or that can’t be used any more. Since detaching is a bit complex, the only reliable way to consider is to prevent any GridViewColumn reusing.
Better, the old columns’ manager (GridViewColumnsManager) is no more useful and it’s substituted by a very simple ObservableCollection of GridViewColumnWrapper. Then, most of the automation hosted in the old manager has been moved into the GridViewEx.
Honestly, it’s a much more elegant solution, and safer as well. Furthermore, it offers a more abstract column-wrapper source, with just a collection.
So, the GridViewEx code is the following:

    public class GridViewEx
        : GridView
    {
        
        #region DP ColumnsSource

        public static readonly DependencyProperty ColumnsSourceProperty = DependencyProperty.Register(
            "ColumnsSource",
            typeof(ObservableCollection<GridViewColumnWrapper>),
            typeof(GridViewEx),
            new PropertyMetadata(
                null,
                (obj, args) =>
                {
                    var ctl = (GridViewEx)obj;
                    ctl.ColumnsSourceChanged(args);
                }));


        public ObservableCollection<GridViewColumnWrapper> ColumnsSource
        {
            get { return (ObservableCollection<GridViewColumnWrapper>)GetValue(ColumnsSourceProperty); }
            set { SetValue(ColumnsSourceProperty, value); }
        }


        private void ColumnsSourceChanged(DependencyPropertyChangedEventArgs args)
        {
            ObservableCollection<GridViewColumnWrapper> source;

            source = args.OldValue as ObservableCollection<GridViewColumnWrapper>;
            if (source != null)
            {
                WeakEventManager<INotifyCollectionChanged, NotifyCollectionChangedEventArgs>.RemoveHandler(
                    source,
                    "CollectionChanged",
                    SourceItemsCollectionChanged
                    );
            }

            source = args.NewValue as ObservableCollection<GridViewColumnWrapper>;
            if (source != null)
            {
                WeakEventManager<INotifyCollectionChanged, NotifyCollectionChangedEventArgs>.AddHandler(
                    source,
                    "CollectionChanged",
                    SourceItemsCollectionChanged
                    );
            }

            this.Align();
        }

        #endregion


        void SourceItemsCollectionChanged(
            object sender,
            System.Collections.Specialized.NotifyCollectionChangedEventArgs e)
        {
            this.Align();
        }


        /// <summary>
        /// Provides to align the target collection by the source's one.
        /// The default implementation is a simple positional one-to-one mirroring.
        /// </summary>
        /// <remarks>
        /// The wrapper and the actual column instances are compared by leveraging
        /// the column's hash code, which is stored privately inside the wrapper
        /// </remarks>
        protected virtual void Align()
        {
            if (this.ColumnsSource == null)
                return;

            int ixt = 0;
            for (int ixs = 0; ixs < this.ColumnsSource.Count; ixs++)
            {
                GridViewColumnWrapper wrapper = this.ColumnsSource[ixs];
                int pos = -1;

                if (this.Columns.Count > ixt)
                {
                    //search for the column equivalent to the current wrapper
                    pos = this.Columns.Count;
                    while (--pos >= 0 && this.Columns[pos].GetHashCode() != wrapper.ColumnHash) ;
                }

                if (pos >= 0)
                {
                    //the column was found, but adjust its position only
                    //when is not already correct
                    if (pos != ixt)
                        this.Columns.Move(pos, ixt);
                }
                else
                {
                    //the column was not found, so create a new one
                    var col = new GridViewColumn();
                    wrapper.ColumnHash = col.GetHashCode();

                    //simple copy of the header, so a further binding is also possible
                    col.Header = wrapper.Header;

                    //sets the initial (nominal) width of the column
                    col.Width = wrapper.Width;

                    //yields a column initialization, whereas available
                    if (wrapper.Initializer != null)
                    {
                        wrapper.Initializer(wrapper, col);
                    }

                    this.Columns.Insert(ixt, col);

                    //creates the behavior for the length animation
                    var bvr = new LengthAnimationBehavior(GridViewColumn.WidthProperty);
                    Interaction.GetBehaviors(col).Add(bvr);
                    bvr.ControlledValueChanged += bvr_ControlledValueChanged;

                    //binds the nominal width of the column to the behavior
                    BindingOperations.SetBinding(
                        bvr,
                        LengthAnimationBehavior.NominalLengthProperty,
                        new Binding("Width")
                        {
                            Source = wrapper,
                        });

                    //also binds the visibility to the behavior
                    BindingOperations.SetBinding(
                        bvr,
                        LengthAnimationBehavior.IsVisibleProperty,
                        new Binding("IsVisible")
                        {
                            Source = wrapper,
                        });

                    //now finally enables the animation
                    bvr.IsAnimationEnabled = true;
                }

                ixt++;
            }

            //removes any no further useful column
            while (this.Columns.Count > ixt)
                this.Columns.RemoveAt(ixt);
        }


        /// <summary>
        /// Event handler for the actual column's width changing
        /// </summary>
        /// <param name="sender"></param>
        /// <param name="e"></param>
        /// <remarks>
        /// This is very useful for keeping track of the manual resizing
        /// of any grid-view column. Every width changing off the animation,
        /// will be notified here.
        /// </remarks>
        void bvr_ControlledValueChanged(object sender, ControlledValueChangedEventArgs e)
        {
            var col = (GridViewColumn)e.AssociatedObject;
            var hash = col.GetHashCode();
            var item = this.ColumnsSource.FirstOrDefault(_ => _.ColumnHash == hash);
            if (item != null)
            {
                //update the nominal width in the wrapper with
                //the desired one
                item.Width = col.Width;
            }
        }

    }

The above view is used as follows:

        <ListView
            ItemsSource="{Binding Path=People, Source={x:Static local:App.Current}}"
            Grid.Row="1"
            x:Name="lvw1"
            >
            <ListView.Resources>
                <local:ColumnHeaderEnableConverter x:Key="cv1" />
                <Style TargetType="{x:Type GridViewColumnHeader}">
                    <Setter Property="IsEnabled" Value="{Binding Path=ActualWidth, RelativeSource={RelativeSource Mode=Self}, Converter={StaticResource cv1}}" />
                </Style>
            </ListView.Resources>

            <ListView.View>
                <local:GridViewEx
                    AllowsColumnReorder="False"
                    ColumnsSource="{Binding Path=.}"
                    >
                </local:GridViewEx>
            </ListView.View>
        </ListView>

That’s much simplified than the past solution, because even the underlying code has got simpler:

    public partial class MainWindow : Window
    {
        public MainWindow()
        {
            InitializeComponent();
        }


        private readonly ObservableCollection<GridViewColumnWrapper> _manager = new ObservableCollection<GridViewColumnWrapper>();


        private void Button_Click(object sender, RoutedEventArgs e)
        {
            if (this._manager.Count == 0)
            {
                //the very first time, the manager should be
                //filled up with the desired columns
                this.AddItem("FirstName", 100, true);
                this.AddItem("LastName", 100, true);
                //this.AddItem("Company", 150, true);

                this.AddItem("Address", 200, false);
                this.AddItem("City", 120, false);
                //this.AddItem("County", 100, false);
                this.AddItem("State", 50, false);
                this.AddItem("ZIP", 60, false);

                this.AddItem("Phone", 150, false);
                //this.AddItem("Fax", 100, false);
                this.AddItem("Email", 150, false);
                //this.AddItem("Web", 180, false);
            }

            //create then show the secondary window,
            //containing the grid
            var win = new Window1();
            win.Owner = this;
            win.DataContext = this._manager;
            win.ShowDialog();
        }


        //just a helper for creating a column wrapper
        private void AddItem(string caption, double width, bool isVisible)
        {
            var mi = new GridViewColumnWrapper();
            mi.Header = caption;
            mi.Width = width;
            mi.IsVisible = isVisible;

            //here is the opportunity to set the cell content:
            //either a direct data or even a more useful data-binding
            mi.Initializer = (sender, gvc) => gvc.DisplayMemberBinding = new Binding(caption);

            this._manager.Add(mi);
        }

    }

Conclusion.

Hopefully this release will be the final one. I test this source better in the near future, and any improvement or bug will be fixed accordingly.
Really can’t miss a final word on the XAML Spy tool, which surprised me a lot for the amazing features it offers. However, as seen, the flexibility of such a tool dramatically cuts the time of debugging and inspecting apps, especially when they’re running.

Here is the source code of the app.

Hacking the WPF GridView – Adding the animation

UPDATE: this article still deserves a bit of mention, but has been superseded by a revision of the code due to some issues. Please, have a look at this article instead.

In the first part of the WPF GridView hacking, I shown how to hide one or more column upon a certain boolean source.
Here I’ll show you a little complex hacking in order to achieve the same functionality, but adding an animation to get the collapsing/expanding ability more fancy.
Just to let you understand better what’s the goal, have a look at this short video:

How to approach the problem?

The animation capability is a well built-in feature of the WPF. I first considered to leverage the animation by using a StoryBoard or a simpler BeginAnimation over the GridViewColumn’s Width property, but…
The simplest way to animate a property is using the BeginAnimation, without any StoryBoard. However, this works only in code, and you must use a StoryBoard when in the XAML.
The following example is taken from the MSDN library documentation:

// Animate the button's width.
DoubleAnimation widthAnimation = new DoubleAnimation(120, 300, TimeSpan.FromSeconds(5));
widthAnimation.RepeatBehavior = RepeatBehavior.Forever;
widthAnimation.AutoReverse = true;
animatedButton.BeginAnimation(Button.WidthProperty, widthAnimation);

The above snippet indicates that a simple converter won’t help us for the animation, but we actually need some powerful tool.

Derive from a Behavior generic class.

It’s a been that the WPF added the powerful capability of adding one or more Behaviors to any DependencyObject-derived object. A Behavior is an elegant way to extend the functionality of a certain object, whereas it is not possible to directly modify it. I’d also add that even having the ability to modify it, a behavioral-pattern yields a lot of abstraction, thus a much greater component reuse.
At this point, the behavior should have to be attached to the GridViewColumn instance, and should also expose at least two properties:

  • IsVisible, of type Boolean, which aims the control of the related column’s visibility, and
  • NominalWidth, of type Double, which specifies the expanded-state width of the same column.

Once attached, the behavior should control the Width property of the owning’s column. Something like this:

    public class WidthAnimationBehavior
        : Behavior<GridViewColumn>
    {

        #region DP NominalLength

        public static readonly DependencyProperty NominalLengthProperty = DependencyProperty.Register(
            "NominalLength",
            typeof(double),
            typeof(WidthAnimationBehavior),
            new PropertyMetadata(
                double.NaN,
                (obj, args) =>
                {
                    var ctl = (WidthAnimationBehavior)obj;
                    ctl.NominalLengthChanged(args);
                }));


        /// <summary>
        /// Represent the nominal length value to be considered
        /// when the element is visible
        /// </summary>
        public double NominalLength
        {
            get { return (double)GetValue(NominalLengthProperty); }
            set { SetValue(NominalLengthProperty, value); }
        }


        private void NominalLengthChanged(DependencyPropertyChangedEventArgs args)
        {
            this.TriggerAnimation();
        }

        #endregion


        #region DP IsVisible

        public static readonly DependencyProperty IsVisibleProperty = DependencyProperty.Register(
            "IsVisible",
            typeof(bool),
            typeof(WidthAnimationBehavior),
            new PropertyMetadata(
                false,
                (obj, args) =>
                {
                    var ctl = (WidthAnimationBehavior)obj;
                    ctl.IsVisibleChanged(args);
                }));


        /// <summary>
        /// Get and set whether the element has to be considered visible.
        /// In this context, the "visibility" is meant as the element's
        /// length expanded (nominal length) or collapsed (zero).
        /// </summary>
        public bool IsVisible
        {
            get { return (bool)GetValue(IsVisibleProperty); }
            set { SetValue(IsVisibleProperty, value); }
        }


        private void IsVisibleChanged(DependencyPropertyChangedEventArgs args)
        {
            this.TriggerAnimation();
        }

        #endregion


        private void TriggerAnimation()
        {
            var targetWidth = this.IsVisible
                ? this.NominalLength
                : 0.0;

            if (targetWidth > 0.0 &&
                this.AssociatedObject.Width == 0.0)
            {
                //begin open

            }
            else if (targetWidth == 0.0 &&
                this.AssociatedObject.Width > 0.0)
            {
                //begin close
                
            }
        }
    }

The actual problem is that the BeginAnimation method is declared in the Animatable class, but the GridViewColumn class does not derive from it.
Let’s continue digging…

Use a timer instead…

Of course there are many ways to manage an animation: I believe the most straightforward is using a normal timer as a clock. Better, a DispatcherTimer, since the goal is dealing heavily with the UI thread, and a specific timer will surely lead a better result.
The above behavior class gets a bit more complex, but still offers a decent functionality without messing the code too much.
Here is the revised class:

    public class WidthAnimationBehavior
        : Behavior<GridViewColumn>
    {
        /// <summary>
        /// Define how long takes the animation
        /// </summary>
        /// <remarks>
        /// The value is expressed as clock interval units
        /// </remarks>
        private const int StepCount = 10;


        public WidthAnimationBehavior()
        {
            //create the clock used for the animation
            this._clock = new DispatcherTimer(DispatcherPriority.Render);
            this._clock.Interval = TimeSpan.FromMilliseconds(20);
            this._clock.Tick += _clock_Tick;
        }


        private DispatcherTimer _clock;
        private int _animationStep;
        private double _fromLength;
        private double _toLength;


        #region DP NominalLength

        public static readonly DependencyProperty NominalLengthProperty = DependencyProperty.Register(
            "NominalLength",
            typeof(double),
            typeof(WidthAnimationBehavior),
            new PropertyMetadata(
                double.NaN,
                (obj, args) =>
                {
                    var ctl = (WidthAnimationBehavior)obj;
                    ctl.NominalLengthChanged(args);
                }));


        /// <summary>
        /// Represent the nominal length value to be considered
        /// when the element is visible
        /// </summary>
        public double NominalLength
        {
            get { return (double)GetValue(NominalLengthProperty); }
            set { SetValue(NominalLengthProperty, value); }
        }


        private void NominalLengthChanged(DependencyPropertyChangedEventArgs args)
        {
            this.TriggerAnimation();
        }

        #endregion


        #region DP IsVisible

        public static readonly DependencyProperty IsVisibleProperty = DependencyProperty.Register(
            "IsVisible",
            typeof(bool),
            typeof(WidthAnimationBehavior),
            new PropertyMetadata(
                false,
                (obj, args) =>
                {
                    var ctl = (WidthAnimationBehavior)obj;
                    ctl.IsVisibleChanged(args);
                }));


        /// <summary>
        /// Get and set whether the element has to be considered visible.
        /// In this context, the "visibility" is meant as the element's
        /// length expanded (nominal length) or collapsed (zero).
        /// </summary>
        public bool IsVisible
        {
            get { return (bool)GetValue(IsVisibleProperty); }
            set { SetValue(IsVisibleProperty, value); }
        }


        private void IsVisibleChanged(DependencyPropertyChangedEventArgs args)
        {
            this.TriggerAnimation();
        }

        #endregion


        private void TriggerAnimation()
        {
            this._animationStep = StepCount;
            this._clock.IsEnabled = true;
        }


        /// <summary>
        /// Clock ticker, mainly used for the animation
        /// </summary>
        /// <param name="sender"></param>
        /// <param name="e"></param>
        void _clock_Tick(object sender, EventArgs e)
        {
            if (this.AssociatedObject != null)
            {
                if (this._animationStep-- == StepCount)
                {
                    //calculates the from/to values to be used for the animation
                    this._fromLength = double.IsNaN(this.AssociatedObject.Width) ? 0.0 : this.AssociatedObject.Width;
                    this._toLength = this.NominalLength * (this.IsVisible ? 1.0 : 0.0);

                    if (Math.Abs(this._toLength - this._fromLength) < 0.1)
                    {
                        //the points match, thus there's no needs to animate
                        this._animationStep = 0;
                        this._clock.Stop();
                    }
                }

                if (this._clock.IsEnabled)
                {
                    //applies the easing function, whereas defined
                    double relative = (StepCount - this._animationStep) / (double)StepCount;
                    double value = this._fromLength + relative * (this._toLength - this._fromLength);

                    this.AssociatedObject.Width = value;
                }

                if (this._animationStep <= 0)
                {
                    //the animation is over: stop the clock
                    this._animationStep = 0;
                    this._clock.Stop();
                }
            }
            else
            {
                //no animation or no target: stop the clock immediately
                this._animationStep = 0;
                this._clock.Stop();
            }
        }

    }

On the XAML side, the documenti will show as follows:

<ListView
    ItemsSource="{Binding Path=People, Source={x:Static local:App.Current}}"
    Grid.Row="1"
    x:Name="lvw1"
    >
    <ListView.View>
        <GridView
            AllowsColumnReorder="False"
            >
            <GridViewColumn Header="FirstName" Width="100" DisplayMemberBinding="{Binding Path=FirstName}" />
            <GridViewColumn Header="LastName" Width="100" DisplayMemberBinding="{Binding Path=LastName}" />

            <GridViewColumn Header="Address" DisplayMemberBinding="{Binding Path=Address}">
                <i:Interaction.Behaviors>
                    <local:WidthAnimationBehavior NominalLength="200" IsVisible="{Binding Path=IsChecked, ElementName=ChkLoc}" />
                </i:Interaction.Behaviors>
            </GridViewColumn>

            <GridViewColumn Header="City" Width="120" DisplayMemberBinding="{Binding Path=City}" />
            <GridViewColumn Header="State" Width="50" DisplayMemberBinding="{Binding Path=State}" />
            <GridViewColumn Header="ZIP" Width="60" DisplayMemberBinding="{Binding Path=ZIP}" />
                    
            <GridViewColumn Header="Phone" Width="150" DisplayMemberBinding="{Binding Path=Phone}" />
            <GridViewColumn Header="Email" Width="150" DisplayMemberBinding="{Binding Path=Email}" />
        </GridView>
    </ListView.View>
</ListView>

NOTE: for readiness reasons, the XAML snippet shown is just the ListView. Also, the behavior has been applied only to the “Address” column, but it could have be applied to any other column.

Again, there’s no code behind, and that’s a good news. The usage in the XAML context is not much complex than using a normal converter. Most of the uncommon tag structure is due by the attached collection, which holds the real behavior instance.
How is the result now? This video says more than thousand words!

So, everything seems fine!…Well, not at all yet.
When the column is expanded (i.e. visible) I should be able to resize, whereas this is a desired feature. By the way, I can do it, but the new width is not stored anywhere, and a new collapse/expansion will lose the desired setting.

A dramatic new approach.

Okay, I need also another feature: the ability to add/remove the columns at runtime. That’s because our LOB app for the timber drying regulation (Cet Electronics), can’t rely on a prefixed set of columns, and the real set depends on the regulator model/state.
Moreover, the animation behavior runs fine, but…why not rethink that class in order to use for many more double-value animations?
That’s for saying that the above trick is valuable for many applications, yet not enough for a pretty flexible usage in a professional context.
So, I approached the GridViewColumns management via a proxy, where each column is mirrored by a view-model instance. I don’t know if the term “view-model” is appropriate in this case, because the GridViewColumn is actually a kind of view-model for the real elements hosted in the visual tree.
Anyway, the deal is hosting this “proxy” in some place, where the business layer would adjust the virtual columns as it wants. At that point the view (i.e. a ListView+GridView) may bind safely to this proxy, thus the visual result should match the expectations.

As for “safely”, I mean without any kind of memory-leak.

For the final solution the XAML is amazingly clean, but it’s also obvious because most of the work is done in the code behind.

<Window 
    x:Class="ListViewHacking.Window1"
    xmlns="http://schemas.microsoft.com/winfx/2006/xaml/presentation"
    xmlns:x="http://schemas.microsoft.com/winfx/2006/xaml"
    xmlns:local="clr-namespace:ListViewHacking"
    Title="ListView hacking demo" 
    Height="480" Width="900"
    WindowStartupLocation="CenterOwner"
    FontSize="14"
    Background="{StaticResource BG}"
    >
    
        
    <Grid
        Margin="50,40"
        >
        <Grid.RowDefinitions>
            <RowDefinition Height="Auto" />
            <RowDefinition Height="*" />
        </Grid.RowDefinitions>
        
        <StackPanel
            Orientation="Horizontal"
            Grid.Row="0"
            Margin="20,8"
            >
            <CheckBox Content="Show location columns" x:Name="ChkLoc" Click="ChkLoc_Click" Margin="20,0" />
            <CheckBox Content="Show contact columns" x:Name="ChkCont" Click="ChkCont_Click" Margin="20,0" />
        </StackPanel>
        
        <ListView
            ItemsSource="{Binding Path=People, Source={x:Static local:App.Current}}"
            Grid.Row="1"
            x:Name="lvw1"
            >
            <ListView.View>
                <local:GridViewEx
                    AllowsColumnReorder="False"
                    ColumnsSource="{Binding Path=TargetCollection}"
                    >
                </local:GridViewEx>
            </ListView.View>
        </ListView>
        
    </Grid>
</Window>

However, there’s a minimal handling for the checkboxes’ events:

    public partial class Window1 : Window
    {
        public Window1()
        {
            InitializeComponent();
        }


        private void ChkLoc_Click(object sender, RoutedEventArgs e)
        {
            var mirror = (GridViewColumnManager)this.DataContext;
            var isVisible = this.ChkLoc.IsChecked == true;

            //manage the visibility for the specified columns
            for (int i = 2; i <= 5; i++)
            {
                mirror.SourceItems[i].IsVisible = isVisible;
            }
        }


        private void ChkCont_Click(object sender, RoutedEventArgs e)
        {
            var mirror = (GridViewColumnManager)this.DataContext;
            var isVisible = this.ChkCont.IsChecked == true;

            //manage the visibility for the specified columns
            for (int i = 6; i <= 7; i++)
            {
                mirror.SourceItems[i].IsVisible = isVisible;
            }
        }

    }

Now, the columns’ configuration is fully done in the code behind, specifically in the main window:

    /// <summary>
    /// Interaction logic for MainWindow.xaml
    /// </summary>
    public partial class MainWindow : Window
    {
        public MainWindow()
        {
            InitializeComponent();
        }


        private GridViewColumnManager _manager = new GridViewColumnManager();


        private void Button_Click(object sender, RoutedEventArgs e)
        {
            if (this._manager.SourceItems.Count == 0)
            {
                //the very first time, the manager should be
                //filled up with the desired columns
                this.AddItem("FirstName", 100, true);
                this.AddItem("LastName", 100, true);

                this.AddItem("Address", 200, false);
                this.AddItem("City", 120, false);
                this.AddItem("State", 50, false);
                this.AddItem("ZIP", 60, false);

                this.AddItem("Phone", 150, false);
                this.AddItem("Email", 150, false);
            }

            //create then show the secondary window,
            //containing the grid
            var win = new Window1();
            win.Owner = this;
            win.DataContext = this._manager;
            win.ShowDialog();
        }


        //just a helper for creating a column wrapper
        private void AddItem(string caption, double width, bool isVisible)
        {
            var mi = new GridViewColumnWrapper();
            mi.Header = caption;
            mi.Width = width;
            mi.IsVisible = isVisible;

            //here is the opportunity to set the cell content:
            //either a direct data or even a more useful data-binding
            mi.Initializer = (sender, gvc) => gvc.DisplayMemberBinding = new Binding(caption);
            
            this._manager.SourceItems.Add(mi);
        }

    }

Here is the final version of the behavior:

    /// <summary>
    /// Perform a length animation overtime, without using data binding.
    /// It is a normal behavior that can be attached to any <see cref="System.Windows.DependencyObject"/>
    /// </summary>
    /// <remarks>
    /// Currently only the <see cref="System.Double"/> type is supported
    /// </remarks>
    public class LengthAnimationBehavior
        : Behavior<DependencyObject>
    {
        /// <summary>
        /// Define how long is the delay time before actually starting the animation
        /// </summary>
        /// <remarks>
        /// The value is expressed as clock interval units
        /// </remarks>
        private const int DelayCount = 10;

        /// <summary>
        /// Define how long takes the animation
        /// </summary>
        /// <remarks>
        /// The value is expressed as clock interval units
        /// </remarks>
        private const int StepCount = 10;


        /// <summary>
        /// Create the instance and specify what's
        /// the target property to animate
        /// </summary>
        /// <param name="dp"></param>
        public LengthAnimationBehavior(DependencyProperty dp)
        {
            this._dp = dp;

            //create the clock used for the animation
            this._clock = new DispatcherTimer(DispatcherPriority.Render);
            this._clock.Interval = TimeSpan.FromMilliseconds(20);
            this._clock.Tick += _clock_Tick;

            //see: http://wpf-animation.googlecode.com/svn/trunk/src/WPF/Animation/PennerDoubleAnimation.cs
            this.EasingFunction = (t, b, c, d) =>
            {
                //a quintic easing function
                if ((t /= d / 2) < 1)
                    return c / 2 * t * t * t * t * t + b;
                else
                    return c / 2 * ((t -= 2) * t * t * t * t + 2) + b;
            };
        }


        private DependencyProperty _dp;

        private DispatcherTimer _clock;
        private int _animationStep;
        private double _fromLength;
        private double _toLength;

        /// <summary>
        /// Get and set the easing function to be used for the animation
        /// </summary>
        public Func<double, double, double, double, double> EasingFunction { get; set; }


        #region DP NominalLength

        public static readonly DependencyProperty NominalLengthProperty = DependencyProperty.Register(
            "NominalLength",
            typeof(double),
            typeof(LengthAnimationBehavior),
            new PropertyMetadata(
                double.NaN,
                (obj, args) =>
                {
                    var ctl = (LengthAnimationBehavior)obj;
                    ctl.NominalLengthChanged(args);
                }));


        /// <summary>
        /// Represent the nominal length value to be considered
        /// when the element is visible
        /// </summary>
        public double NominalLength
        {
            get { return (double)GetValue(NominalLengthProperty); }
            set { SetValue(NominalLengthProperty, value); }
        }


        private void NominalLengthChanged(DependencyPropertyChangedEventArgs args)
        {
            if (this.IsAnimationEnabled)
            {
                this._animationStep = DelayCount + StepCount;
                this._clock.IsEnabled = true;
            }
            else
            {
                this.SetImmediately();
            }
        }

        #endregion


        #region DP TargetValue

        private static readonly DependencyProperty TargetValueProperty = DependencyProperty.Register(
            "TargetValue",
            typeof(object),
            typeof(LengthAnimationBehavior),
            new PropertyMetadata(
                null,
                (obj, args) =>
                {
                    var ctl = (LengthAnimationBehavior)obj;
                    ctl.TargetValueChanged(args);
                }));


        /// <summary>
        /// Used as mirror of the target property value.
        /// It's a simple way to be notified of any value change
        /// </summary>
        /// <remarks>
        /// Please, note that's everything private
        /// </remarks>
        private object TargetValue
        {
            get { return (object)GetValue(TargetValueProperty); }
            set { SetValue(TargetValueProperty, value); }
        }


        private void TargetValueChanged(DependencyPropertyChangedEventArgs args)
        {
            if (this.IsVisible &&
                (this._animationStep <= 0 || this._animationStep > StepCount))
            {
                //fire the related event
                this.OnControlledValueChanged(this.AssociatedObject);
            }
        }

        #endregion


        #region DP IsVisible

        public static readonly DependencyProperty IsVisibleProperty = DependencyProperty.Register(
            "IsVisible",
            typeof(bool),
            typeof(LengthAnimationBehavior),
            new PropertyMetadata(
                false,
                (obj, args) =>
                {
                    var ctl = (LengthAnimationBehavior)obj;
                    ctl.IsVisibleChanged(args);
                }));


        /// <summary>
        /// Get and set whether the element has to be considered visible.
        /// In this context, the "visibility" is meant as the element's
        /// length expanded (nominal length) or collapsed (zero).
        /// </summary>
        public bool IsVisible
        {
            get { return (bool)GetValue(IsVisibleProperty); }
            set { SetValue(IsVisibleProperty, value); }
        }


        private void IsVisibleChanged(DependencyPropertyChangedEventArgs args)
        {
            if (this.IsAnimationEnabled)
            {
                this._animationStep = DelayCount + StepCount;
                this._clock.IsEnabled = true;
            }
            else
            {
                this.SetImmediately();
            }
        }

        #endregion


        #region DP IsAnimationEnabled

        public static readonly DependencyProperty IsAnimationEnabledProperty = DependencyProperty.Register(
            "IsAnimationEnabled",
            typeof(bool),
            typeof(LengthAnimationBehavior),
            new PropertyMetadata(
                false,
                (obj, args) =>
                {
                    var ctl = (LengthAnimationBehavior)obj;
                    ctl.IsAnimationEnabledChanged(args);
                }));


        /// <summary>
        /// Get or set whether the animation should run or not.
        /// When disabled, any setting will take place immediately
        /// </summary>
        public bool IsAnimationEnabled
        {
            get { return (bool)GetValue(IsAnimationEnabledProperty); }
            set { SetValue(IsAnimationEnabledProperty, value); }
        }


        private void IsAnimationEnabledChanged(DependencyPropertyChangedEventArgs args)
        {
            if ((bool)args.NewValue == false)
            {
                this._animationStep = 0;
                this._clock.Stop();
            }
        }

        #endregion


        /// <summary>
        /// Allow to set the new target length immediately,
        /// without any animation or delay
        /// </summary>
        private void SetImmediately()
        {
            if (this.AssociatedObject != null)
            {
                this.AssociatedObject.SetValue(
                    this._dp,
                    this.NominalLength * (this.IsVisible ? 1.0 : 0.0)
                    );
            }
        }


        /// <summary>
        /// Clock ticker, mainly used for the animation
        /// </summary>
        /// <param name="sender"></param>
        /// <param name="e"></param>
        void _clock_Tick(object sender, EventArgs e)
        {
            if (this.IsAnimationEnabled &&
                this.AssociatedObject != null)
            {
                //check the initial delay
                if (--this._animationStep > StepCount)
                    return;

                //when the delay expires...
                if (this._animationStep == StepCount)
                {
                    //...calculates the from/to values to be used for the animation
                    this._fromLength = (double)this.TargetValue;
                    this._toLength = this.NominalLength * (this.IsVisible ? 1.0 : 0.0);

                    if (Math.Abs(this._toLength - this._fromLength) < 0.1)
                    {
                        //the points match, thus there's no needs to animate
                        this._animationStep = 0;
                        this._clock.Stop();
                    }
                }

                if (this._clock.IsEnabled)
                {
                    //applies the easing function, whereas defined
                    double value = this.EasingFunction(
                        StepCount - this._animationStep,
                        this._fromLength,
                        this._toLength - this._fromLength,
                        StepCount
                        );

                    this.AssociatedObject.SetValue(
                        this._dp,
                        value
                        );
                }

                if (this._animationStep <= 0)
                {
                    //the animation is over: stop the clock
                    this._animationStep = 0;
                    this._clock.Stop();
                }
            }
            else
            {
                //no animation or no target: stop the clock immediately
                this._animationStep = 0;
                this._clock.Stop();
            }
        }


        /// <summary>
        /// The behavior has just been attached to the object
        /// </summary>
        protected override void OnAttached()
        {
            base.OnAttached();

            BindingOperations.SetBinding(
                this,
                LengthAnimationBehavior.TargetValueProperty,
                new Binding()
                {
                    Path = new PropertyPath(this._dp),
                    Source = this.AssociatedObject,
                    Mode = BindingMode.OneWay,
                });
        }


        /// <summary>
        /// The behavior has just been detached to the object
        /// </summary>
        protected override void OnDetaching()
        {
            BindingOperations.ClearBinding(
                this,
                LengthAnimationBehavior.TargetValueProperty
                );

            base.OnDetaching();
        }


        #region EVT ControlledValueChanged

        /// <summary>
        /// Provide the notification of any change
        /// of the target property value, when the animation
        /// is not active
        /// </summary>
        public event EventHandler<ControlledValueChangedEventArgs> ControlledValueChanged;


        private void OnControlledValueChanged(DependencyObject associated)
        {
            var handler = this.ControlledValueChanged;

            if (handler != null)
            {
                handler(
                    this,
                    new ControlledValueChangedEventArgs(associated)
                    );
            }
        }

        #endregion

    }


    /// <summary>
    /// Event arguments for the notification of any change
    /// of the target property value, when the animation
    /// is not active
    /// </summary>
    public class ControlledValueChangedEventArgs
        : EventArgs
    {
        public ControlledValueChangedEventArgs(DependencyObject associated)
        {
            this.AssociatedObject = associated;
        }

        public DependencyObject AssociatedObject { get; private set; }
    }

Here is the proxy manager and a minimal realization of the column mirror model:

    /// <summary>
    /// Proxy for the columns collection used in a grid-view
    /// </summary>
    public class GridViewColumnManager
    {
        public GridViewColumnManager()
        {
            //create the source items collection instance
            this._sourceItems = new ObservableCollection<GridViewColumnWrapper>();
            this._sourceItems.CollectionChanged += SourceItemsCollectionChanged;

            //create the target columns collection instance
            this._targetCollection = new ObservableCollection<GridViewColumn>();
        }


        #region PROP SourceItems

        private readonly ObservableCollection<GridViewColumnWrapper> _sourceItems;

        /// <summary>
        /// Collection reference for the column wrapper items
        /// </summary>
        public ObservableCollection<GridViewColumnWrapper> SourceItems 
        {
            get { return this._sourceItems; }
        }

        #endregion


        #region PROP TargetCollection

        private readonly ObservableCollection<GridViewColumn> _targetCollection;

        /// <summary>
        /// Columns collection reference for the grid-view
        /// </summary>
        public IEnumerable<GridViewColumn> TargetCollection
        {
            get { return this._targetCollection; }
        }

        #endregion


        void SourceItemsCollectionChanged(
            object sender,
            System.Collections.Specialized.NotifyCollectionChangedEventArgs e)
        {
            this.Align();
        }


        /// <summary>
        /// Provides to align the target collection by the source's one.
        /// The default implementation is a simple positional one-to-one mirroring.
        /// </summary>
        /// <remarks>
        /// The wrapper and the actual column instances are compared by leveraging
        /// the column's hash code, which is stored privately inside the wrapper
        /// </remarks>
        protected virtual void Align()
        {
            int ixt = 0;
            for (int ixs = 0; ixs < this._sourceItems.Count; ixs++)
            {
                GridViewColumnWrapper wrapper = this._sourceItems[ixs];
                int pos = -1;

                if (this._targetCollection.Count > ixt)
                {
                    //search for the column equivalent to the current wrapper
                    pos = this._targetCollection.Count;
                    while (--pos >= 0 && this._targetCollection[pos].GetHashCode() != wrapper.ColumnHash) ;
                }

                if (pos >= 0)
                {
                    //the column was found, but adjust its position only
                    //when is not already correct
                    if (pos != ixt)
                        this._targetCollection.Move(pos, ixt);
                }
                else
                {
                    //the column was not found, so create a new one
                    var col = new GridViewColumn();
                    wrapper.ColumnHash = col.GetHashCode();

                    //simple copy of the header, so a further binding is also possible
                    col.Header = wrapper.Header;

                    //sets the initial (nominal) width of the column
                    col.Width = wrapper.Width;

                    //yields a column initialization, whereas available
                    if (wrapper.Initializer != null)
                    {
                        wrapper.Initializer(wrapper, col);
                    }

                    this._targetCollection.Insert(ixt, col);

                    //creates the behavior for the length animation
                    var bvr = new LengthAnimationBehavior(GridViewColumn.WidthProperty);
                    Interaction.GetBehaviors(col).Add(bvr);
                    bvr.ControlledValueChanged += bvr_ControlledValueChanged;

                    //binds the nominal width of the column to the behavior
                    BindingOperations.SetBinding(
                        bvr,
                        LengthAnimationBehavior.NominalLengthProperty,
                        new Binding("Width")
                        {
                            Source = wrapper,
                        });

                    //also binds the visibility to the behavior
                    BindingOperations.SetBinding(
                        bvr,
                        LengthAnimationBehavior.IsVisibleProperty,
                        new Binding("IsVisible")
                        {
                            Source = wrapper,
                        });

                    //now finally enables the animation
                    bvr.IsAnimationEnabled = true;
                }

                ixt++;
            }

            //removes any no further useful column
            while (this._targetCollection.Count > ixt)
                this._targetCollection.RemoveAt(ixt);
        }


        /// <summary>
        /// Event handler for the actual column's width changing
        /// </summary>
        /// <param name="sender"></param>
        /// <param name="e"></param>
        /// <remarks>
        /// This is very useful for keeping track of the manual resizing
        /// of any grid-view column. Every width changing off the animation,
        /// will be notified here.
        /// </remarks>
        void bvr_ControlledValueChanged(object sender, ControlledValueChangedEventArgs e)
        {
            var col = (GridViewColumn)e.AssociatedObject;
            var hash = col.GetHashCode();
            var item = this._sourceItems.FirstOrDefault(_ => _.ColumnHash == hash);
            if (item != null)
            {
                //update the nominal width in the wrapper with
                //the desired one
                item.Width = col.Width;
            }
        }

    }


    public class GridViewColumnWrapper
        : INotifyPropertyChanged
    {

        internal int ColumnHash;

        public string Name { get; set; }
        public Action<GridViewColumnWrapper, GridViewColumn> Initializer { get; set; }


        #region PROP Header

        private object _header;

        public object Header
        {
            get { return this._header; }
            set
            {
                if (this._header != value)
                {
                    this._header = value;
                    this.OnPropertyChanged("Header");
                }
            }
        }

        #endregion


        #region PROP Width

        private double _width;

        public double Width
        {
            get { return this._width; }
            set
            {
                if (this._width != value)
                {
                    this._width = value;
                    this.OnPropertyChanged("Width");
                }
            }
        }

        #endregion


        #region PROP IsVisible

        private bool _isVisible;

        public bool IsVisible
        {
            get { return this._isVisible; }
            set
            {
                if (this._isVisible != value)
                {
                    this._isVisible = value;
                    this.OnPropertyChanged("IsVisible");
                }
            }
        }

        #endregion


        #region EVT PropertyChanged

        public event PropertyChangedEventHandler PropertyChanged;


        protected virtual void OnPropertyChanged(string propertyName)
        {
            var handler = this.PropertyChanged;

            if (handler != null)
            {
                handler(
                    this,
                    new PropertyChangedEventArgs(propertyName));
            }
        }

        #endregion

    }

Finally, a derivation of the native GridView, because we need the ability to bind its column collection, but it is not available.

    public class GridViewEx
        : GridView
    {

        #region DP ColumnsSource

        public static readonly DependencyProperty ColumnsSourceProperty = DependencyProperty.Register(
            "ColumnsSource",
            typeof(ObservableCollection<GridViewColumn>),
            typeof(GridViewEx),
            new PropertyMetadata(
                null,
                (obj, args) =>
                {
                    var ctl = (GridViewEx)obj;
                    ctl.ColumnsSourceChanged(args);
                }));


        public ObservableCollection<GridViewColumn> ColumnsSource
        {
            get { return (ObservableCollection<GridViewColumn>)GetValue(ColumnsSourceProperty); }
            set { SetValue(ColumnsSourceProperty, value); }
        }


        private void ColumnsSourceChanged(DependencyPropertyChangedEventArgs args)
        {
            ObservableCollection<GridViewColumn> source;

            source = args.OldValue as ObservableCollection<GridViewColumn>;
            if (source != null)
            {
                source.CollectionChanged -= source_CollectionChanged;
            }

            this.Columns.Clear();

            source = args.NewValue as ObservableCollection<GridViewColumn>;
            if (source != null)
            {
                foreach (var col in source)
                {
                    this.Columns.Add(col);
                }

                source.CollectionChanged += source_CollectionChanged;
            }
        }

        #endregion


        void source_CollectionChanged(object sender, NotifyCollectionChangedEventArgs e)
        {
            switch (e.Action)
            {
                case NotifyCollectionChangedAction.Add:
                    this.Columns.Add((GridViewColumn)e.NewItems[0]);
                    break;

                case NotifyCollectionChangedAction.Remove:
                    this.Columns.Remove((GridViewColumn)e.OldItems[0]);
                    break;

                case NotifyCollectionChangedAction.Move:
                    this.Columns.Move(e.OldStartingIndex, e.NewStartingIndex);
                    break;

                case NotifyCollectionChangedAction.Replace:
                    this.Columns[e.NewStartingIndex] = (GridViewColumn)e.NewItems[0];
                    break;

                case NotifyCollectionChangedAction.Reset:
                    this.Columns.Clear();
                    break;
            }
        }

    }

If you noticed, in the demo video the grid is hosted in a separate window than the main one. That’s for two reasons:

  • verify that the closure of the child windows won’t lead to any leak, and
  • verify that any manual width change on the columns has to be preserved even when the window is destroyed.

Conclusion.

I know, the final version is pretty complex when compared to the solution seen till now. However, the benefits are noticeable: here are briefly summarized:

  • Of course, the primary target is fully available: each column can be hidden or shown, via a simple bool setting;
  • the columns’ configuration is totally controlled by the back view-model;
  • ease of save/load (persist) the user’s size setting;
  • the animation behavior is now a more generic “animation of a length” (of type Double);
  • there was an effort to avoid any modification of the style of the ListView, so that all the functionality should not have any impact with the user’s style;

Next time, we’ll see that even this final release is not perfect, and it has a subtle issue. We’ll learn how to fix it by leveraging the right tool!

By clicking here, you may download the basic (simplified) demo application. Click here to download the final release, instead.

Hacking the WPF GridView – How to hide columns

First part of (supposed) three about some tricky hackings around the WPF GridView, most used view mode of the very versatile ListView.
I think the ListView + GridView is a very good compromise for many grid-layered collection-presentation: simple but never uselessly complex.

In this first section I’ll show how to solve a pretty common task: control the visibility of a column.
That should be trivial if only the GridView (that is the GridViewColumn class) would have exposed any visibility property. So, it appears that the simplest way is to control the column’s width: by taking it to zero, the column actually disappear.
Note that this trick won’t prevent the columns to be part of the visual tree: it is still there, although the size is irrelevant.

Create the base application.

First off, we should create a base application to work with. That app should provide a bunch of data (the classic “Person” class), then present them in a grid-viewed fashion.
I got the data from a useful web site. The site offers several various-sized data set for a typical usage. I chose the set with 500 records. I never had to deal with huge set of data, instead with complex shaped. However, that’s not the focus.
Again, in the attached app there is the code to parse the CSV dataset: it’s simple, but this post won’t focus on how to parse it.

So, here follows the XAML source to show the data set on a GridView shaped ListView.

<Window 
    x:Class="ListViewHacking.MainWindow"
    xmlns="http://schemas.microsoft.com/winfx/2006/xaml/presentation"
    xmlns:x="http://schemas.microsoft.com/winfx/2006/xaml"
    xmlns:local="clr-namespace:ListViewHacking"
    Title="ListView hacking demo" 
    Height="480" Width="900"
    WindowStartupLocation="CenterScreen"
    FontSize="14"
    Background="{StaticResource BG}"
    >
    
    <Grid
        Margin="50,40"
        >
        <Grid.RowDefinitions>
            <RowDefinition Height="Auto" />
            <RowDefinition Height="*" />
        </Grid.RowDefinitions>

        <StackPanel
            Orientation="Horizontal"
            Grid.Row="0"
            Margin="20,8"
            >
            <CheckBox Content="Show location columns" x:Name="ChkLoc" Margin="20,0" />
            <CheckBox Content="Show contact columns" x:Name="ChkCont" Margin="20,0" />
        </StackPanel>

        <ListView
            ItemsSource="{Binding Path=People, Source={x:Static local:App.Current}}"
            Grid.Row="1"
            >
            <ListView.Resources>
                <local:ColumnWidthConverter x:Key="cvColumnWidth" />
            </ListView.Resources>
            
            <ListView.View>
                <GridView
                    AllowsColumnReorder="False"
                    >
                    <GridViewColumn Header="FirstName" Width="100" DisplayMemberBinding="{Binding Path=FirstName}" />
                    <GridViewColumn Header="LastName" Width="100" DisplayMemberBinding="{Binding Path=LastName}" />

                    <GridViewColumn Header="Address" Width="200" DisplayMemberBinding="{Binding Path=Address}" />
                    <GridViewColumn Header="City" Width="120" DisplayMemberBinding="{Binding Path=City}" />
                    <GridViewColumn Header="State" Width="50" DisplayMemberBinding="{Binding Path=State}" />
                    <GridViewColumn Header="ZIP" Width="60" DisplayMemberBinding="{Binding Path=ZIP}" />
                    
                    <GridViewColumn Header="Phone" Width="150" DisplayMemberBinding="{Binding Path=Phone}" />
                    <GridViewColumn Header="Email" Width="150" DisplayMemberBinding="{Binding Path=Email}" />
                </GridView>
            </ListView.View>
        </ListView>

    </Grid>
</Window>

Note that there’s no underlying C# code behind this XAML.
The result, once started, is the following:

listview1

A converter for the column width.

As stated, the simplest way to control the column width by a boolean parameter is using a converter, as the WPF framework specifies. For simplicity, we’ll consider the visibility as a boolean “show”/”no-show”: the ability to hide a column by preserving its width (as the Visiblity enum allows) is not supported here.

    /// <summary>
    /// This converter targets a column header,
    /// in order to take its width to zero when
    /// it should be hidden
    /// </summary>
    public class ColumnWidthConverter
        : IValueConverter
    {
        public object Convert(
            object value, 
            Type targetType, 
            object parameter, 
            System.Globalization.CultureInfo culture)
        {
            var isVisible = (bool)value;
            var width = double.Parse(parameter as string);
            return isVisible ? width : 0.0;
        }


        public object ConvertBack(
            object value, 
            Type targetType, 
            object parameter, 
            System.Globalization.CultureInfo culture)
        {
            throw new NotImplementedException();
        }

    }

Upon that, the XAML structure should be modified according, as below shown:

<Window 
    x:Class="ListViewHacking.MainWindow"
    xmlns="http://schemas.microsoft.com/winfx/2006/xaml/presentation"
    xmlns:x="http://schemas.microsoft.com/winfx/2006/xaml"
    xmlns:local="clr-namespace:ListViewHacking"
    Title="ListView hacking demo" 
    Height="480" Width="900"
    WindowStartupLocation="CenterScreen"
    FontSize="14"
    Background="{StaticResource BG}"
    >
    
    <Grid
        Margin="50,40"
        >
        <Grid.RowDefinitions>
            <RowDefinition Height="Auto" />
            <RowDefinition Height="*" />
        </Grid.RowDefinitions>

        <StackPanel
            Orientation="Horizontal"
            Grid.Row="0"
            Margin="20,8"
            >
            <CheckBox Content="Show location columns" x:Name="ChkLoc" Margin="20,0" />
            <CheckBox Content="Show contact columns" x:Name="ChkCont" Margin="20,0" />
        </StackPanel>

        <ListView
            ItemsSource="{Binding Path=People, Source={x:Static local:App.Current}}"
            Grid.Row="1"
            x:Name="lvw1"
            >
            <ListView.Resources>
                <local:ColumnWidthConverter x:Key="cvColumnWidth" />
            </ListView.Resources>
            
            <ListView.View>
                <GridView
                    AllowsColumnReorder="False"
                    >
                    <GridViewColumn Header="FirstName" Width="100" DisplayMemberBinding="{Binding Path=FirstName}" />
                    <GridViewColumn Header="LastName" Width="100" DisplayMemberBinding="{Binding Path=LastName}" />

                    <GridViewColumn 
                        Header="Address" 
                        Width="{Binding Path=IsChecked, ElementName=ChkLoc, Converter={StaticResource cvColumnWidth}, ConverterParameter=200}" 
                        DisplayMemberBinding="{Binding Path=Address}" 
                        />
                    <GridViewColumn 
                        Header="City" 
                        Width="{Binding Path=IsChecked, ElementName=ChkLoc, Converter={StaticResource cvColumnWidth}, ConverterParameter=120}" 
                        DisplayMemberBinding="{Binding Path=City}" 
                        />
                    <GridViewColumn 
                        Header="State" 
                        Width="{Binding Path=IsChecked, ElementName=ChkLoc, Converter={StaticResource cvColumnWidth}, ConverterParameter=50}" 
                        DisplayMemberBinding="{Binding Path=State}" 
                        />
                    <GridViewColumn 
                        Header="ZIP"
                        Width="{Binding Path=IsChecked, ElementName=ChkLoc, Converter={StaticResource cvColumnWidth}, ConverterParameter=60}" 
                        DisplayMemberBinding="{Binding Path=ZIP}" 
                        />

                    <GridViewColumn 
                        Header="Phone" 
                        Width="{Binding Path=IsChecked, ElementName=ChkCont, Converter={StaticResource cvColumnWidth}, ConverterParameter=150}" 
                        DisplayMemberBinding="{Binding Path=Phone}" 
                        />
                    <GridViewColumn 
                        Header="Email" 
                        Width="{Binding Path=IsChecked, ElementName=ChkCont, Converter={StaticResource cvColumnWidth}, ConverterParameter=150}" 
                        DisplayMemberBinding="{Binding Path=Email}" 
                        />
                </GridView>
            </ListView.View>
        </ListView>

    </Grid>
</Window>

The demo above shows that there are two checkboxes: one controls the visibility of the “location” info of each person (row), and the second controls the contacts (phone and e-mail).
The visual result is pretty straightforward.

listview2

Conclusion.

The converter-way is the simplest solution we can use to solve the problem of hiding the columns of a gridview. However, there are many other features we can add, and that is what will be explained in the next articles.

Click here to download the sample application.