Introduction.
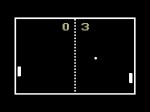
This article show a concrete application of the circuit presented in my previous post.
Although the hacking is something versatile, it has been focused on driving LCD modules in general.
Here is a presentation of a small yet powerful library to simplify the graphic management, even having few memory resources.
Hardware.
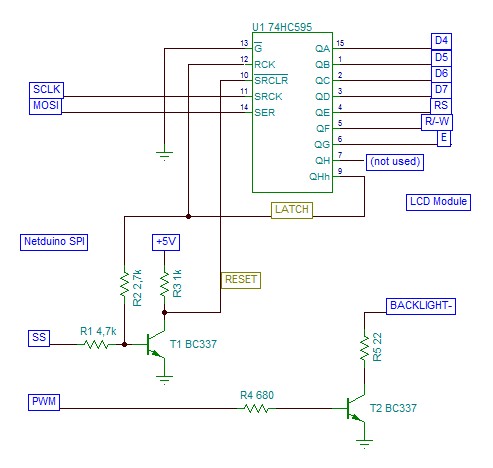
There’s almost no changes from the circuit shown in my past article: just some improvement, which has been tested over two-three different kinds of LCD modules. Every time, with no problems.
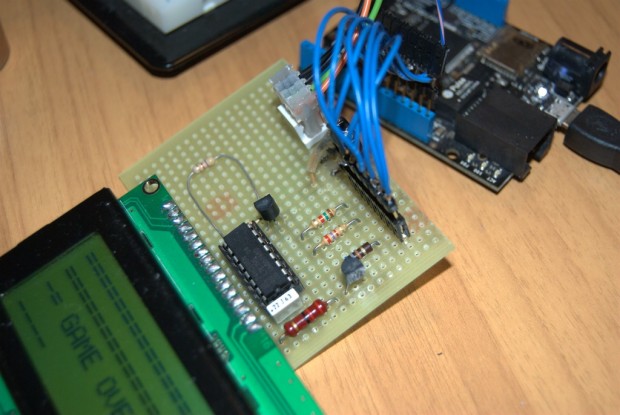
For my convenience, I created the circuit on a piece of proto-board. I know, it’s not the best solution I could do, but it seems working okay. It’s easy to connect, and it leaves the Netduino pins free for further extensions.
I just added a transistor more, to drive the LCD backlight, where available. Nothing special, but it came almost for free, because luckily on the same Netduino connector there’s a PWM output also.
By the way, there’s no power supply, and most of the LCDs are using the old, faithful, +5VDC. Thus, I used a dedicated connector, using the same pinout as the *duino like connector. It means almost nothing, but it’s worthwhile keeping almost the same pinout pattern, as for convention.
Moreover, this separate power connector yields to a dedicate power supply, instead of overloading the Netduino’s embedded regulator.
Software.
Having a very fast data transfer offers the possibility to structure the library better. Abstraction is asking often a little more of memory resources, but also yields to a better integration of modules. The result is somewhat amazing, at least for a managed device as Netduino is.
First off, I wanted to separate the two layers involved in the UI: the physical and the logical. The physical layer is meant as the “driver”, which actually knows how is the LCD module, its features, and much more. The logical layer should not know anything about the hardware, instead has to organize the user’s API at best, so the user will find comfortable interacting with any display.
Of course this is just the goal: we must bear in mind that never ever will achieve a WPF-like APIs.
Secondly, I wished to offer the APIs in two flavors. Okay, the library is actually the same, but the user can choose to access the display in a imperative-way, or in a declarative-way. However, you can mix all that: no exclusivity at all.
The imperative way is the most intuitive (really?), which came from our childhood. Most of the personal computer had no enough resources, and the “do this”/”do that” programming manner became the most famous. Both the code samples contained in my old post about LCD driving with SPI, are shaped in the imperative fashion.
The declarative way is much more powerful, elegant, and -I’d add- intuitive. Instead of polluting our code with specific actions, let’s declare a bunch of “object”, which we’ll interact with. Each object has its own properties, along with methods. Isn’t sounding familiar?
Further I’ll show a small example of using the LcdBoost library, taking advantage of its declarative APIs.
How is this library made?
As stated, the library is designed to be a “satellite” project to be linked to your own application. You shouldn’t copy-and-paste modules, which leads to errors, and misalignment.
The user interact normally with the logical layer, although it can access the specific physical layer wherever some custom chip-tailored function should be performed. For instance, often the LCD modules are based on the Hitachi HD44780 chip, which offers a character pattern customization. This feature is specific for that chip, thus should be accessed directly to the driver instance.
Also, the library is meant to be improved, and extended. Both the logical and the physical layers are structured to be easily extended. Physical drivers are pluggable, and the logical graphic entities are also pluggables.
At the moment of writing this post, there’s only support for character matrix LCD modules. I’d like to drive some dot-matrix module, but I’m not sure to be able to do it.
The imperative access consists in just three methods:
        /// <summary>
        /// Clear the entire screen
        /// </summary>
        public void Clear()
        {
            // ...
        }


        /// <summary>
        /// Set the starting (reference) position
        /// to be used by any further text operation
        /// </summary>
        /// <param name="x"></param>
        /// <param name="y"></param>
        public void SetCursorPosition(
            int x,
            int y
            )
        {
            // ...
        }


        /// <summary>
        /// Write a text string (as plain ASCII) on the video cache
        /// </summary>
        /// <param name="text">The string to be written</param>
        /// <remarks>
        /// The text starting reference has to be set by using the <see cref="SetCursorPosition"/>.
        /// After this call, the logical position is moved accordingly
        /// </remarks>
        public void Write(string text)
        {
            // ...
        }
It’s really the minimum, and -honestly- I would not care so much, in favor of the declarative APIs (which I’m proud of!)
Okay, I’m a big fan of WPF, thus I *tried* to mimic that approach. The problem is that WPF would require *TONS* of memory, plus several parts of the regular framework, not implemented in the .Net Micro Framework.
So, the declarative API allow to operate with objects, which must implement a common interface:
namespace Toolbox.NETMF.Hardware
{
    /// <summary>
    /// Fundamental interface for implementing any graphic element
    /// to be managed in the declarative-way by the LcdBoos library
    /// </summary>
    public interface ILcdBoostElement
    {
        /// <summary>
        /// Indicates whether the graphic element is hidden or not
        /// </summary>
        bool IsHidden { get; }

        /// <summary>
        /// Renders the element's cache onto the video viewport
        /// </summary>
        /// <param name="cache">The target video cache to be filled</param>
        /// <param name="container">The parent container bounding rectangle</param>
        void Render(
            LcdBoostVideoCache cache,
            LcdBoostRect container
            );
    }
}
The library comes with just two “renderable” objects (so far):
It’s clearly limited to the character-matrix modules, but surely enough at first attempt.
Again, the LcdBoostElementCharPoint is a particular case of the more generic LcdBoostElementTextArea. It has been tailored for a single character entity, but is performing much better due the fewer calculations.
Performance.
Well, I had hard time to believe my eyes: the rendering is blazing fast. The physical driver has been improved several times, always within a compromise of performance and readability.
I must admit that the only result I have are for character matrix display, all based on the Hitachi HD44780 chip. The “practical” result is that the slowest part is surely the LCD itself, but…I mean the *real* LCD: the crystals! It looks that the crystal inertia is so huge, that you can reach 2-3 fps. At this point, the Netduino speed is a minor problem.
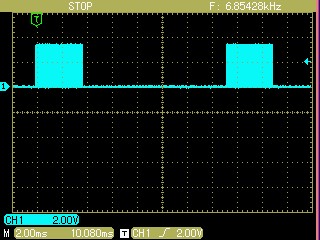
Anyway, here is a couple of snapshots taken with the scope.
The first one shows the overall rendering process (logic arrangement, plus physical transfer), along the timer cycle (100ms). The high-level interval is the actual busy period.
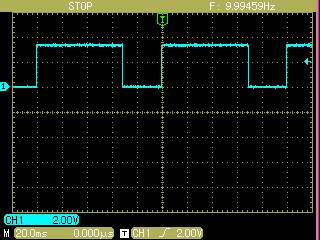
The second picture (below) is showing the physical transfer time via SPI. Since my display is a 20×4 character matrix, the transfer is accomplished on two sequential steps. The overall transfer takes less than 20 ms.
NOTE: the timing of the pictures is based on the demo game presented below.
A simple demo game.
To be attractive, a sample should be something funny.
Here is a simple pong-like game. The game itself has no meaning: using a 20×4 display is still playable with difficulty.
The interesting thing is how readable is the code, and how simple is creating even complex tasks. I’d also add that a similar approach will probably improve both efficiency, and compactness of the resulting code.
Do you have ever programmed any XNA game?
Well, the concept is quite simple: declare your resources (e.g. bitmaps, sounds, etc), then add the game logic. All the life is hanging to a “loop” which renders the game scenery. Here is the same.
Just add your ILcdBoostElement-derived elements to an array, that will be you resource-bag to be rendered. Afterward, the actual rendering will be performed automatically within a timed loop.
namespace Toolbox.NETMF.Hardware
{
    /// <summary>
    /// A demo of a simple pong-like game
    /// </summary>
    /// <remarks>
    /// The aim of the demo is demonstrating how simpler is
    /// creating even pretty complex games, by taking advantage
    /// of the declarative approach, instead of the imperative one.
    ///
    /// The paddle is controlled by any numeric port
    ///
    /// NOTE: although this demo can work on any lcd size,
    /// has been tailored for a 20x4 char matrix LCD module
    /// </remarks>
    class DemoPong
    {
        private const int BrickRows = 2;
        private const int BrickColumns = 16;
        private const int TotalBricks = BrickRows * BrickColumns;

        private const int AvailablePaddles = 5;

        private static LcdBoostElementCharPoint[][] _elem_bricks;
        private static LcdBoostElementTextArea _elem_paddle;
        private static LcdBoostElementTextArea _elem_score;
        private static LcdBoostElementTextArea _elem_paddles_left;
        private static LcdBoostElementCharPoint _elem_ball;
        private static LcdBoostElementTextArea _elem_gameover;

        private static Random _rnd;


        public static void Run(
            LcdBoostProxy lcd,
            NumericInput paddle)
        {
            //init the random number generator using a pseudo random seed
            _rnd = new Random(DateTime.Now.Millisecond);

            //define an array for containing all the UI-elements
            var elements = new ILcdBoostElement[TotalBricks + 6];
            var elem_count = 0;

            /**
             * Allocates the resources to be used in the program
             * this is very similar to the "sprite" approach
             **/

            //right-side wall
            var wall = new LcdBoostElementTextArea();
            wall.Text = "||||";
            wall.Bounds.Left = 16;
            wall.Bounds.Top = 0;
            wall.Bounds.Width = 1;
            wall.Bounds.Height = 4;
            elements[elem_count++] = wall;


            // ...


            /**
             * Create a new session of game.
             * The session contains only the dynamic data used
             * by the game. The logic is meant to be outside.
             * That's much like a functional approach
             **/
            var session = new GameSession();
            session.NewBall();


            /**
             * Master clock for the game refresh
             *
             * Notice that the clock is handling the display refresh
             * at 10 fps, but the game logic has to be slowed down
             * because would be too fast to play
             **/
            int clock_counter = 0;
            var clock = new Timer(
                _ =>
                {
                    //invoke the game logic
                    Worker(
                        session,
                        clock_counter++
                        );

                    //refresh display
                    lcd.Dump(elements);
                },
                null,
                100,
                100);


            Thread.Sleep(Timeout.Infinite);
        }


        /// <summary>
        /// The game logic
        /// </summary>
        /// <param name="session"></param>
        /// <param name="clock_counter"></param>
        private static void Worker(
            GameSession session,
            int clock_counter)
        {
            //stop logic when there'are no more paddles left
            if (session.PaddlesLeft <= 0)
                return;

            //timer scaling to slow down the game logic
            if ((clock_counter & 0x07) != 0)
                return;

            //retrieve the current ball coords
            int x = _elem_ball.X;
            int y = _elem_ball.Y;

            // ...

        }


        /// <summary>
        ///
        /// </summary>
        private class GameSession
        {
            /// <summary>
            /// Overall score
            /// </summary>
            public int Score;

            /// <summary>
            /// Paddles left
            /// </summary>
            public int PaddlesLeft = AvailablePaddles;

            /// <summary>
            /// 2D vector defining the ball speed
            /// </summary>
            public readonly Vector BallSpeed = new Vector();


            /// <summary>
            /// Init for a new incoming ball
            /// </summary>
            public void NewBall()
            {
                int n = _rnd.Next(10000);

                //gets the new ball position
                _elem_ball.X = 2 + n % 12;
                _elem_ball.Y = 0;

                //gets the new ball speed
                this.BallSpeed.DX = n < 5000 ? -1 : 1;
                this.BallSpeed.DY = 1;

                //update the paddles left box
                _elem_paddles_left.Text = "_" + this.PaddlesLeft.ToString() + "_";
            }
        }


        /// <summary>
        /// Simple class for defining a 2D vector
        /// </summary>
        private class Vector
        {
            public int DX;
            public int DY;

            public void InvertX()
            {
                this.DX = -this.DX;
            }

            public void InvertY()
            {
                this.DY = -this.DY;
            }
        }

    }
}
As seen previously, in the performance section, the rendering loop is timed to refresh the display on every 100 ms, that is 10 fps. It’s fairly poor as it were a normal video game, but it’s indeed too fast to be playable. Thus, the logic update has been scaled down of a factor of 8.
The paddle controller deserves a word of mention.
The poor-man game controller
In any decent arcade game, the controller is an important component. However, I’m not going to produce video-consoles, nor focusing on the comparison on game controllers. I just needed a quick-and-dirty way to move the paddle for my pong-like game, but…I also realized that I hadn’t anything fitting the goal.
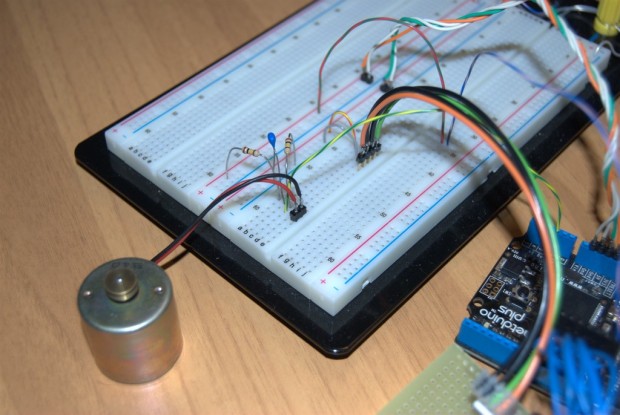
So, I took my bag of trashy stuffs, carefully collected by my (poor) dad, and I began digging. The most obvious thing is the last to be considered: why not a normal brushed motor? My dad had dozen of small motors, so I got one of them, probably originally built on a old tape-deck.
The circuit is somewhat ridiculous: just a 1/2 voltage divider, and the motor. Okay, I’ve seen that a capacitor is a good way to get the reading more stable.
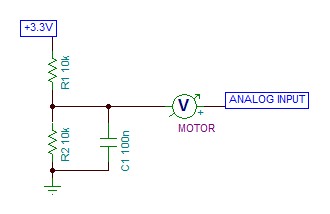
The voltage divider just creates an halfway voltage, so that the working point for the ADC is about in the middle of the range. As stated, the capacitor yields more stability to this voltage point. Finally, the motor is connected from this voltage divider, and any Netduino analog input.
When you take the motor spinning by using fingers, it works actually as a dynamo, and produces a little voltage. This voltage can be either positive or negative respect to the voltage divider point. The software samples the analog input periodically, and converts the samples accordingly.
As long you don’t get the motor spinning fast, there’s no danger at all.
Conclusions.
Once again, Netduino does it better.
It’s just another little piece of knowledge to get you working better with Netduino, and the .Net Micro Framework. Sometime the solution isn’t coming quickly as expected, but collecting experience helps a lot.
Future goals is hacking the new gaming console Netduino-based: the PIX-6T4, by Nwazet.
The library is part of the Cet Open Toolbox, and can be downloaded together with schematics and Fritzing diagrams.
Mario,
It looks awesome. I cant wait to give it a try.
Good work.
Jeff
Very cool use of a motor as a controller. I use pots for paddles.
Wish I had time to play with this stuff a bit more. Great article Mario!
Hi there,
Great article, which I could get it to work. I’ve tried to find your schematic at the MS Framework Toolbox, but can’t. I’ve worked of yours in this article, but can’t seem to get it working. Do you perhaps have a complete layout somewhere I could download?
Kind regards
Riaan
Hello Riaan.
The very last line of the article exposes a link where you can download the whole project. The only problem is that you must change the extension from “.doc” to “.zip” (it’s actually a zip archive, not a Word document).
I mean that this way is a bit confusing, thus I’ll move all of them in a better repository.
Hi Mario,
Thanks for coming back to me so quickly. I did download that DOC earlier and did extract the source from the ZIP, thank you.
I was looking for your schematic you said was at MS Framework Toolbox, because the one in this article I can’t seem to get working, and there’s non in the ZIP file.
Thank you once again for your help and your prompt reply is as always, much appreciated.
Kind regards
Riaan
Hmm…what kind of “schematic” are you meaning? The picture in the “hardware” section (above), does not fit your needs?
If mean a “Fritzing view”, I don’t like to create it. That’s because many times yields to a constrained (yet dangerous) guidance for the users. Suppose, for instance, that the transistor is not the same, but an equivalent with a different pinout.
What else do you need?
I think the best way to explain is show you how I wired your schematic. Maybe you can see if I did something wrong. Please check the picture at : http://i45.tinypic.com/2n80pix.png
I’ve converted your lib to run on 4.2 (just recompiled it on it without errors). My code is simple, it’s like so:
var driver = LcdBoostFactory.Create20x4(Pins.GPIO_PIN_D10);
var lcd = new LcdBoostProxy(driver);
lcd.SetCursorPosition(0, 0); lcd.Write(“Mobimine.NET”);
Thread.Sleep(Timeout.Infinite);
I hope it’s a wiring problem.
The wiring looks correct as long (1) the transistor pinout in the same as the BC337, and (2) the LCD module pinout is also correct (there are some models having different pinout).
I never tested the software with the 4.2, but I think should work.
What do you see on the display? Totally blank? Some random char? The backlight is on? What else?
Hi Mario,
I’ve now build your layout but without luck. It still doesn’t work. I’ve used new components so there shouldn’t be a problem. I’ve designed the Veriboard layout as a shield like so : http://i48.tinypic.com/iokro5.png
The LCD2 pinouts are GND, 5V, Contrast, RS, R/W, E and LCD1 are D4, D5, D6, D7, 5V, GND.
The only funny component I have on there is the 1K and 1.8K resistors instead of your 2.7K. I’m sure this should not be a problem.
Your help or suggestions would be appreciated.
Kind regards
Riaan
Sorry, by the way, the screen is just blank. If I adjust the pod you can see the contrast changes. The backlight is also on. I know the LCD works since I’ve used it with another slower library.
Sorry for the delay. The circuit looks okay.
I’ve noticed that you didn’t call “lcd.Dump()” in the above snippet. Any operation is cached, then you must call “Dump” to move it to the LCD module. If you take a look at my test program, you’ll notice that the “Dump” method is invoked periodically by a timer.
Cheers
Hi Mario,
I’ve spend hours trying to figure out what was wrong. I was convinced it was a wiring issue, and it turns out … I’m a dump-ass !!! LOL, thanks allot, that solved the display problem 🙂
Just a last question, my code below gives unexpected output if I don’t use the lcd.Clear() method
var driver = LcdBoostFactory.Create20x4(Pins.GPIO_PIN_D10);
var lcd = new LcdBoostProxy(driver);
# lcd.Clear();
lcd.SetCursorPosition(0, 0); lcd.Write(“Line 1”);
lcd.SetCursorPosition(0, 1); lcd.Write(“Line 2”);
lcd.SetCursorPosition(0, 2); lcd.Write(“Line 3”);
lcd.SetCursorPosition(0, 3); lcd.Write(“Line 4”);
lcd.Dump();
Thread.Sleep(Timeout.Infinite);
I get artifacts on the screen if there’s no text printed (the white space except for the space I print). I recon this has something to do with your initialization routine ? Do I have to call lcd.Clear() every time before I write something to the lcd?
Anyway, thanks allot for your help, I almost abandoned this quest, and I’m glad I didn’t. My soldering is not that bad … phew !!!
Kind regards
Riaan
By the way, If you want to, you are welcome to use the pictures I’ve created in your article, I’ll be honored.
To tell the truth, the lib is targeted for the “declarative” approach. I mean that you declare some text-boxes, then the clear-dump process should refresh the screen without any explicit user’s invocation. You can also use the “imperative” way, but you must clear-then-dump the cache manually.
You know, it’s much like the “poor man WPF”.
No problem for attaching anything you’ll create. Just mail me some stuffs of your project, and I’ll be glad to attach/refer your results!
Hi Mario,
Sorry for bugging you again. I’m having trouble making this library coexist with another SPI device. I’ve got a SD card also connected but the SS on a difference pin. I’m using the new feature in 4.2, the StorageDevice.MountSD(“SD”, SPI.SPI_module.SPI1, _sdPin); and StorageDevice.Unmount(“SD”); to access the SD.
There is obviously no way to tell your library to stop listening to SPI commands, the best I can do is assign the factory and proxy objects to null, call GC.WaitForPendingFinalizers(); and hope I can call the StorageDevice.MountSD(“SD”, SPI.SPI_module.SPI1, _sdPin); and write to the SD card. When this is done I Unmount again and re-initialize the factory and proxy so I can write to the LCD.
This sort-of works, but I do get artifacts on the screen and sometimes it doesn’t even refresh. Now and then I get errors that says sometime regarding accessing an object that busy being disposed of. I can probably add a Thread.Sleep to wait a little longer while trying to “kill” the object in memory, but I’m sure this is not an ideal solution.
Do you perhaps have any suggestions or ideas how I can do this any better?
Kind regards
Riaan, I’m not sure to understand where your problem is.
The LcdBoost library does not claim any ownership of the SPI: it opens it in the “Send” method of the driver class, leveraging the “using” statement, which forces the disposition of the port when the transfer is over. Basically, the SPI is claimed *only* during the “Dump” invocation, then it’s released for any other task wishing to use it.
This pattern has been chosen straight to share the same SPI among several devices. However, “the SPI sharing” means actually to share all of the SPI signals, but the SS which has to be individual per device.
Again, the LcdBoost library does not listen to any incoming flow on the SPI.
The only thing I may guess about your problem is about a multi-threading race to the SPI chasing. If you are going to manage the same SPI port using many threads, you must add a mutex externally. I’d add it around the driver “Dump” invocation of your app.
Is that answering to your problem?
Hi Mario,
Let me explain this way. The following code results in garbage on the LCD:
var _driver = LcdBoostFactory.Create20x4(Pins.GPIO_PIN_D9);
var _lcd = new LcdBoostProxy(_driver);
StorageDevice.MountSD(“SD”, SPI.SPI_module.SPI1, Pins.GPIO_PIN_D10);
_lcd.Clear();
_lcd.SetCursorPosition(0, 0);
string[] files = System.IO.Directory.GetFiles(“\\SD”);
_lcd.Write(“File count : ” + files.Length.ToString());
_lcd.Dump();
StorageDevice.Unmount(“SD”);
And the following code works correctly:
StorageDevice.MountSD(“SD”, SPI.SPI_module.SPI1, Pins.GPIO_PIN_D10);
string[] files = System.IO.Directory.GetFiles(“\\SD”);
StorageDevice.Unmount(“SD”);
var _driver = LcdBoostFactory.Create20x4(Pins.GPIO_PIN_D9);
var _lcd = new LcdBoostProxy(_driver);
_lcd.Clear();
_lcd.SetCursorPosition(0, 0);
_lcd.Write(“File count : ” + files.Length.ToString());
_lcd.Dump();
This might not seem a big deal, but in my large project it becomes a bit difficult. I have to make sure the SD is unmounted before I can write anything to the LCD.
I hope I’m missing something obvious. Your help is hugely appreciated.
Kind regards
Riaan
I mean. BTW, the problem seems in the StorageDevice driver, which holds the SPI all the time. The LcdBoost itself does not use the SPI at all, unless you call the “Dump” method.
I guess that the only way to share the SPI without problems is your second approach, which releases the SPI after the SD unmounting.
Well, you could try how heavy is the mount-unmount task. If that’s not proibitive, you could create a SD wrapper that uses the SPI only when needed.
The SD issue drives hardly even an hardware solution. Do you have two separate SPIs?
Just as another example, the following code works for the first Dump() and NOT for the second Dump(). The second Dump() corrupts the screen:
var _driver = LcdBoostFactory.Create20x4(Pins.GPIO_PIN_D9);
var _lcd = new LcdBoostProxy(_driver);
_lcd.Clear();
_lcd.SetCursorPosition(0, 0);
_lcd.Write(“Starting”);
_lcd.Dump();
StorageDevice.MountSD(“SD”, SPI.SPI_module.SPI1, Pins.GPIO_PIN_D10);
string[] files = System.IO.Directory.GetFiles(“\\SD”);
StorageDevice.Unmount(“SD”);
_lcd.Clear();
_lcd.SetCursorPosition(0, 1);
_lcd.Write(“File count : ” + files.Length.ToString());
_lcd.Dump();
I am really new at this but where do you put the cet helper files? I mean what folder?
Hello Frank and happy Easter.
This article is relatively old, and the software library has been superseded by a new one. However, the changes are minimal, mostly against the abstraction for sharing the graphic model together with the led matrix.
Please, have a look at these articles by me:
http://tinyclr.it/a-playable-invaders-like-game-with-a-netduino-plus-2.aspx
The repository is related to these projects.
Cheers
This is awesome. I left a comment over at the netduino site here; http://forums.netduino.com/index.php?/topic/3520-lcd-boost-library-for-netduino/#entry64329
Would it help my display performance to implement your “booster” into Stefan’s 74hc595 library. My performance at the moment is pretty sucky. I would really like to do something to boost it. Pun intended.
Thanks